Functional Diagnostic Healing
  • Home
  • About
    • Testimonials
  • Work with Us
    • Contact Us
    • MCAS Webinars
    • SCHEDULE AN APPOINTMENT
    • Supplements
  • Blog

Dark Chocolate Almond Butter Cups

10/21/2014

3 Comments

 
Grain Free. Gluten Free. Vegan.  Paleo. Awesome.
Picture
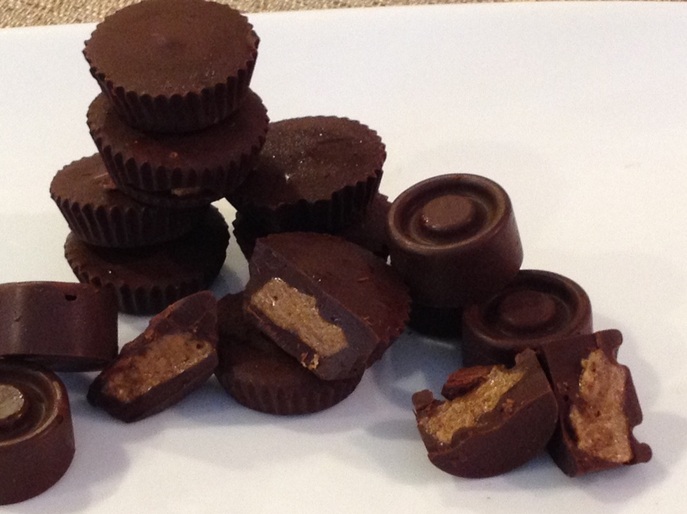
Halloween marks the beginning of that time of the year where there always seems to be endless amounts of candy everywhere you go. It's like you cannot get away, right?! It's at work, the kids bring it home from school, it's at social events, and staring you in the face at every check out stand - its plain difficult to avoid.  One of my favorite candies growing up was Reese's Peanut Butter Cups. Reese's is a product I refuse to put in my body these days, so instead, when I want to treat myself to a piece of candy I choose Justin's Dark Chocolate Almond Butter Cups and sometimes Trader Joe's Dark Chocolate Peanut Butter Cups - both are amazing and made from much higher quality ingredients than Hershey's Brand. 

So I started to think I could just make these myself, get the calories and the sugar down and control my ingredients...and so I did...and found that it is very simple and this recipe and blog are the result. These are 11.7 grams of sugar per serving compared to Justin's and Reese's which are 17 grams and 21 grams respectively. Check it out...

Dark Chocolate Almond Butter Cups (PRINT RECIPE)
Makes 15-16 mini cups or 8-9 larger cups

Ingredients:
¾ cup dark chocolate chips or chopped dark chocolate (60% or higher - I like using 70%)
1 tablespoon coconut oil
¼ cup smooth, all natural, raw almond butter
Pinch of sea salt
½ tablespoon maple syrup

Kitchen Utensils Needed:**
Mini silicone candy molds or silicone mini muffin tray
OR regular mini muffin tray with small baking cups to fit inside

Directions:
  1. Melt chocolate and coconut oil together until very smooth on the stovetop over low heat. You can either use a double broiler to do this, or melt inside a stove top save glass bowl on top of a small amount of slowly boiling water in a pot, or in the microwave .
  2. Use a spoon, small spatula or even unused paint brush and fill each candy mold (about 15 total) or baking cups (about 8 total) 1/4 full of the melted chocolate mixture.  You will only use some of the chocolate melted chocolate in this step; place the rest over low heat to keep it thin and melted.
  3. Carefully use the tip of a metal teaspoon or knife to even out chocolate inside the mold (if needed), then place the entire tray on a flat surface inside the freezer for about 10 minutes or until chocolate is hard and set. 
  4. Combine almond butter, salt, and maple syrup in a small bowl and stir until well incorporated. The maple syrup will make the nut butter thicken up a bit and adds a touch of sweetness. 
  5. Use two small teaspoons and/or spatulas to gently scoop nut butter into each of the chocolate molds, filling the mold up to slightly more than half full total. Use a spatula or back of the teaspoon to keep more of the almond butter distributed towards the center of the candy and leave a little room around the edges for chocolate. 
  6. Slowly drizzle remaining chocolate evenly over the nut butter layer for each piece of candy and spread out using a spatula to get an even finish. 
  7. Place in freezer to set for an additional 20 minutes. Remove from freezer, pop out of molds or peel back baking cups and enjoy cold or wait 5-10 minutes and then eat them.

**If you don't have either a mini muffin tin or a silicone candy tray, you could try using the small baking cups and placing them inside a large muffin tin to set. The small baking cups should be enough to hold the shape - you could even stack 2-3 of them together to give it a little more support. I have not personally tried this, but I don't see why it wouldn't work just fine and I don't want you to buy a new kitchen tool for just one recipe. 

I hope you enjoy this recipe as much as I do. Comment, like and share as it pleases you!

Happy Halloween!
~Billie
3 Comments
Kate
10/22/2014 07:05:18 am

Any thoughts on what I could use instead of the coconut oil? I know it might take some experimenting on my end, but I'm thinking maybe palm oil.

Reply
Billie Shellist
10/22/2014 08:54:21 am

I had a sneaky feeling you were going to ask me that question Kate:) I would try either palm oil or cocao butter. I would try 1 tablespoon and see how that goes. You may need to increase to 1 1/2 or 2. Let me know how it goes.

Reply
Kate
10/23/2014 03:56:02 am

haha, I knew you knew it was coming! thanks, will try it.

Reply


Leave a Reply.

    Picture
    Billie Shellist, FDN-P

    I practice functional nutrition, an approach that allows me to look at your entire health history and help you find the "root causes" of your chronic health complaints.  

    ​This cuts out the trial and error process and helps you get real symptom relief and resolution!


    Food is medicine and knowledge is power -I hope you enjoy my anti-inflammatory recipes which are gluten, dairy, and soy free as well as very low grain and sugar.  

    If you'd like to heal from the root cause(s) of your chronic symptoms,  try starting with a complimentary 15-minute consultation.  Click here to request your free session.


    Categories

    All
    Anti Inflammatory Foods
    Appetizers & Side Dishes
    Autoimmunity
    Beverages & Smoothies
    Breakfast & Brunch
    Desserts
    Detox & Cleansing
    Food Sensitivities
    Gluten & Dairy Free Recipes
    Gluten Free Recipes
    Grain Free Recipes
    Gut & Digestive Health
    Histamine Intolerance/MCAS
    Holiday Recipes
    Hormonal Health
    Kid Friendly
    Main Dishes
    Self Care Practices
    Snacks
    Soups & Salads
    Special Diets
    Vegan Recipes
    Vegetarian Recipes
    Weight Management


Email Us
​Call us: (720) 213-8359


Copyright 2024 Functional Diagnostic Healing. All rights reserved.
Professional photography by Rochelle Blea-Garcia
Privacy Policy   -    Legal Notice
  • Home
  • About
    • Testimonials
  • Work with Us
    • Contact Us
    • MCAS Webinars
    • SCHEDULE AN APPOINTMENT
    • Supplements
  • Blog