
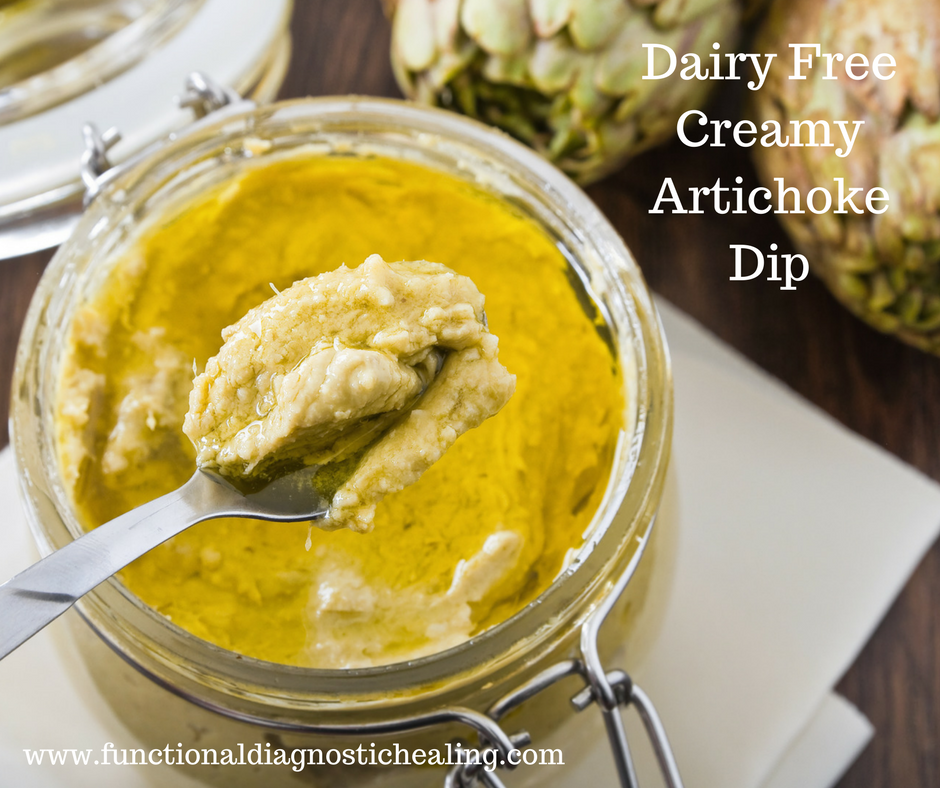
 Artichoke dip is one of the most well loved appetizers out there but is often off limits for those of us who eat a dairy free diet. Well, not any longer my friends...
This delicious dip will blow your mind with its rich, creamy texture and flavor that comes from a combination of white beans and organic mayonnaise made from cage free eggs. It's the perfect addition to your upcoming Easter or Mother's Day brunch celebrations or makes an excellent snack to have on hand for some quick protein and fiber! Plus it comes together in less than 15 minutes. Sometimes for variety, I'll stir in 1 tablespoon homemade pesto as well. Dairy Free Creamy Artichoke Dip: (PRINT RECIPE) Ingredients: 2 cloves garlic, peeled 1 shallot, diced 2 tablespoons lemon juice ½ cup mayonnaise made from cage free eggs and olive oil 1 tablespoon extra virgin olive oil 1 tablespoon apple cider vinegar 1 (15-ounce) can great northern beans/cannellini beans, drained ½ teaspoon salt ½ teaspoon mustard powder ¼ teaspoon pepper 1 (4-ounce) can chopped green chilis, undrained 2 ½ cups canned artichoke hearts, drained (About 1 ½ cans) Serve with your choice of: Raw veggies Gluten free seed crackers Directions:
You can find this recipe and others like it in my Anti-Inflammatory Diet Spring eBook. YUM, YUM, and YUM!! Enjoy! Billie
0 Comments
Anti-Inflammatory. Heart Healthy. Gluten, Dairy, & Soy Free. Low Carb 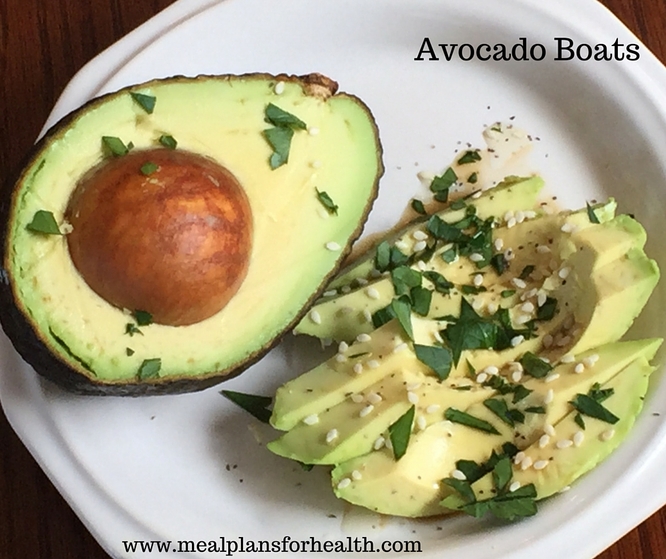 I eat one of these avocado boats everyday, sometimes two of them a day:) Avocados are an amazing medicinal fruit loaded with heart healthy, monounsaturated fats and fiber. In fact this fruit has 7 grams of fiber per serving which is about 25% of your recommended daily intake. Fiber helps steady blood sugar, decrease cravings for carbs and sugar, and improve digestive function.
This is a great snack all by itself or a perfect side dish to round out a meal, especially when you load it with additional anti-inflammatory oils, seeds, and herbs. Scroll down to see suggestions on how to incorporate these beautiful boats into your eating plan... Avocado Boats (PRINT RECIPE): Serves 2 (1/2 an avocado = 1 "avocado boat") Ingredients: 2 ripe avocados 1 tablespoon sesame oil or olive oil 1 tablespoon coconut aminos, gluten free soy sauce, or tamari (optional) 1 tablespoon of sesame seeds or hemp seeds Dash of salt, pepper, and/or garlic granules 2 tablespoons minced cilantro, basil, or parsley Directions:
"Dress up" your avocado boat with the toppings of your choice, here are some of my favorite anti-inflammatory meal combinations and ways to use these delicious boats: Breakfast: 1 slice Sausage & Sage Quiche with Sweet Potato Crust 1 avocado boat with olive oil, garlic granules, salt, & parsley 1 cup sauteed greens (kale, spinach, chard, dandelion) Lunch: 1 serving Crockpot Turmeric Chicken Stew 1 avocado boat with sesame oil, sesame seeds, & cilantro 2 cups mixed greens salad Dinner: 1 serving Sesame-Ginger Salmon 1/2 cup black rice 1 avocado boat with sesame oil, sesame seeds & basil 1-2 cups steamed vegetables like broccoli, green beans, or asparagus Let me know what your favorite combinations are. Enjoy friends! ~Billie p.s. - If you like meals like these, check out our Anti-Inflammatory Meal Plans Gluten Free. Dairy Free Version. Vegan Version.  This dish is one of the meals included in week three of our 28-Day Detox Diet Program and is full of fresh seasonal veggies paired with a bright creamy lemon flavor. It has a lot less fat than traditional risotto and comes together pretty quickly. We've also used quinoa, a "friendly carbohydrate", instead of traditional white or arborio rice to give you an extra boost of protein and fiber. We get heaps of positive feedback from our members and detox diet participants that this is one of their favorite meals in the program, so we wanted to share it with you as well.
Enjoy it alone as a main meal, as a side dish or toss a scoop over some mixed greens or arugula for a nice, lightweight lunch. Feel free to change up the veggie combination to your liking or based on what veggies you have in the fridge already. Broccoli, mushrooms, green beans, or sugar snap peas would all be awesome in this recipe. Lemony Quinoa & Vegetable "Risotto" (PRINT RECIPE) Serves 4-6 Ingredients: 1 cup dry quinoa 1 cup water 1 cup organic low sodium veggie broth 3 tablespoons organic, grass fed butter or organic ghee (use grapeseed oil for vegan version) 3 green onions, diced 2 ears sweet corn, corn cut off cob raw (Substitute 1 additional zucchini or other veggie of choice if corn-free) 1/2 bunch asparagus, cut into 1 inch pieces 1 small zucchini or yellow squash, cut into 1/2 inch square cubes 1/2 cup sugar snap peas, cut in halves 1 bunch fresh basil, diced ½ teaspoon salt, divided ½ teaspoon ground black pepper, divided ¼ cup soft cheese like goat or feta (optional- for dairy free version use 2-4 tablespoons nutritional yeast instead) 2 tablespoons lemon zest (about 1 ½ lemons) 4 tablespoons lemon juice (about 1 ½ lemons) 1 clove garlic, minced 1 tablespoon honey or agave Directions:
Enjoy! ~Billie & Jen Gluten Free. Vegan. Soy Free. Antioxidant Packed. Full of Flavor. 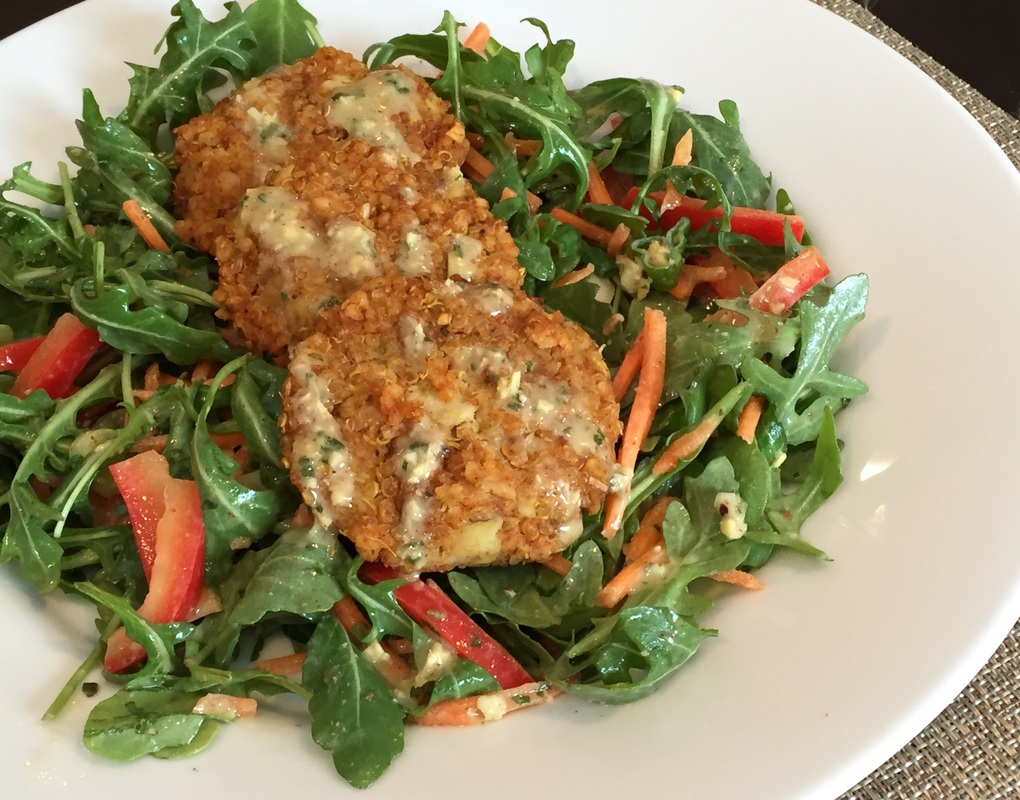 This meal is bursting with antioxidants and packs a flavorful punch - these little patties pair perfectly with your favorite mixed greens, sliced raw veggies, and our dairy and soy free Creamy Thai Vinaigrette Dressing. One of the things I like to do to keep healthy eating easy and make sure I stay on track with my diet is to make 1-2 dishes at the start of each week that I can use as quick lunches. I generally eat a raw lunch of salad and veggies with either a clean protein added like organic chicken or wild caught salmon or a serving of healthy grains or carbs like quinoa, sweet potatoes, or legumes.
When I make these patties, we eat them one night for dinner and then use leftover patties as a healthy and quick lunch option. They also make a great appetizer to put out at your next social gathering! Curried Sweet Potato & Quinoa Patties with Creamy Thai Vinaigrette Dressing (PRINT PATTIES RECIPE) (PRINT DRESSING RECIPE) Makes 12-15 patties, Serving size is 3-4 patties Ingredients: 2 small sweet potatoes, peeled and diced 3/4 cup dry quinoa 2 cloves garlic, minced 1 small sweet onion, finely chopped 1 tablespoon coconut oil, melted 1 teaspoon salt 1 teaspoon pepper 1 tablespoon paprika 2 tablespoons all purpose, brown rice, or quinoa flour 2 teaspoons cumin 2 teaspoons curry powder 2 teaspoons dried oregano 2 cups mixed greens of choice (I used arugula here, use your favorite seasonal green!) Other salad veggies; we recommend sliced red peppers, shredded carrots, chopped avocado, and scallions. Creamy Thai Vinaigrette Dressing Ingredients: 1 ½ tablespoons peanut, almond, or sunflower butter 3 tablespoons full fat canned coconut milk* 2-3 tablespoons cilantro 1 tablespoon soy sauce, tamari, or coconut aminos 1 tablespoon apple cider vinegar 1 tablespoon fresh lime juice 2 teaspoons honey or agave 1 clove garlic, minced 1-inch piece of ginger, peeled and chopped ¼ teaspoon salt ¼ cup olive oil 2 tablespoons sesame oil Directions:
Happy Eating! ~Billie and Jen Grain Free. Gluten Free. Anti-Inflammatory. Low Carb. Vegan. Amazing. 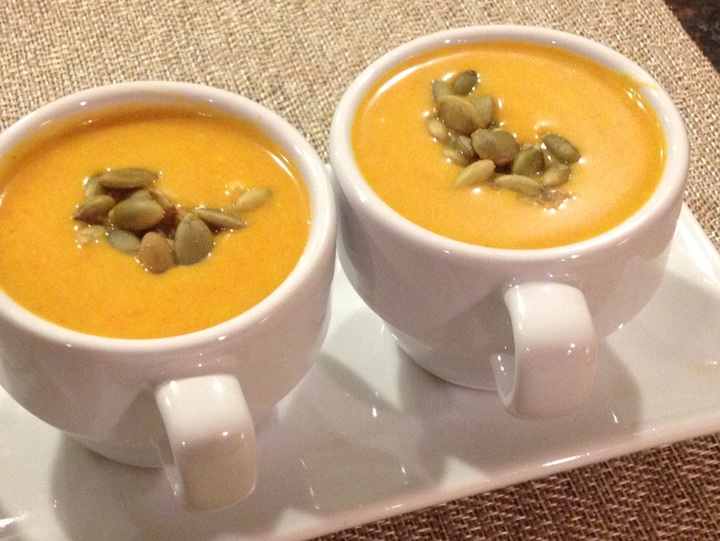 This soup is my new fall food addiction!! Seriously...I'm not kidding, I've made it three times in four weeks if that tells you anything:) With ingredients like ginger, garlic, curry, and carrots this soup boasts some highly anti-inflammatory properites and super soothing and calming to the tummy. Not to mention it really warms you up on a cold fall or winter day. I highly recommend adding some raw or roasted peptias on top for some extra protein, healthy fats, and energy boosting properties to keep you feeling fuller longer.
You can pair this soup with a nice raw salad for lunch or try it with our Kale with Caramelized Shallots for dinner. This would also make an awesome appetizer or starter course for your upcoming holiday meal or dinner party. I like to serve soups like this in small tea or espresso cups when I'm having a fun, festive dinner party. Whether you consume this soup straight out of the pot or from a cute espresso cup, I know you will love it! Curried Sweet Potato & Carrot Soup (PRINT RECIPE) Serves 4 Ingredients: 1 tablespoon coconut oil 1 onion, peeled and roughly chopped 1 clove garlic, minced 4 large carrots, unpeeled, roughly chopped (about ½ inch pieces) 1 small-medium sweet potato, peeled and roughly chopped (about ½ inch cubes) 3 cups vegetable broth 1 (15-ounce) can full-fat coconut milk 1 tablespoon freshly chopped ginger root 2 teaspoons mild curry powder (optional) (Substitute ground turmeric for an anti-inflammatory boost) ½ teaspoon salt ½ teaspoon pepper Garnish: Fresh herbs, pepitas, sunflower seeds, and/or chili flakes Directions:
Enjoy Friends! ~Billie Grain Free. Paleo. Vegan & Vegetarian Versions. 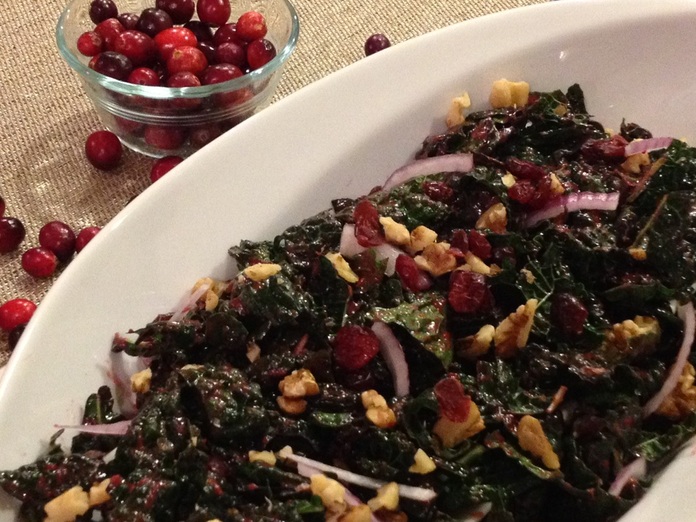 Brighten up your holiday celebration with this beautiful, antioxidant packed side dish! Remember, color equals antioxidants and this salad is packed full of color, flavor, and nutritional goodness. A great recipe to infuse into your holiday spread, this salad is actually best made in advance because the longer you marinate the salad the better it tastes. We recommend an overnight marinating time for best results.
Need a great seasonal weeknight dinner? You can also make this into an entree salad by adding some Crispy Roasted Chickpeas (see recipe) or even some diced roasted sweet potatoes. Or for you meat eaters out there, a nice piece of broiled or roasted salmon or organic grilled chicken breast on top of this salad makes it into a very filling meal. Either way...you can't go wrong...check it out... Marinated Cranberry Kale Salad (PRINT RECIPE) Serves 4-6 Ingredients: 4 oz fresh cranberries 1/3 cup water 2 tablespoons maple syrup 2 tablespoons apple cider vinegar 1 teaspoon Dijon mustard 1/2 teaspoon lemon juice 1/2 teaspoon salt 1/8 teaspoon freshly ground black pepper 1/4-1/2 cup walnut oil or extra virgin olive oil 8 oz fresh kale (Tuscan/Lacinato works best in this recipe) 1/4 cup dried cranberries/craisins (leave out if following an anti-inflammatory or low sugar diet) 1 cup walnuts, coarsely chopped 1/4 cup thinly sliced red onion Soft goat cheese or feta crumbles (optional) Directions:
Happy Holidays! ~Billie & Jennifer Grain Free. Soy Free. Paleo. Vegetarian & Vegan Versions. 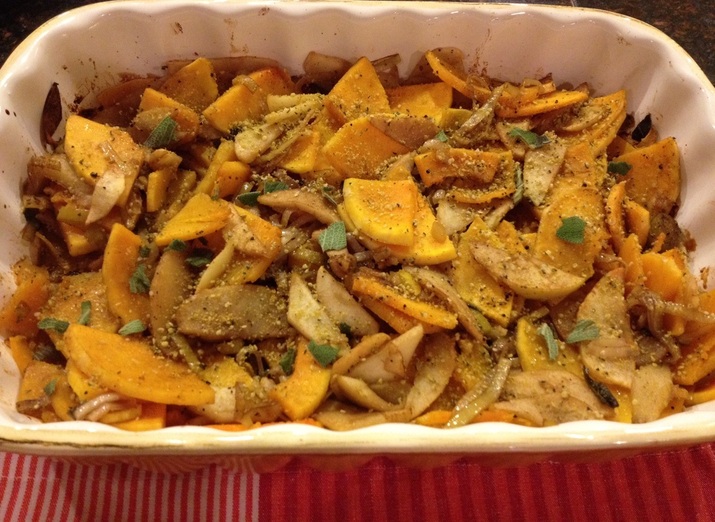 With Thanksgiving just around the corner, we thought we'd give you some great holiday planning recipes and side dishes the whole family will love. This is a new recipe of ours that is full of both sweet and savory flavors. If your family typically does candied yams or a sweet potato souffle or casserole, this dish would run in the same category but uses organic apples to sweeten the dish instead of brown sugar, marshmallows, or other processed sugars that are usually a part of sweet potato casserole. I personally like to eat my sugar in the form of dessert and not a side dish, so this is a great dish to help me not overdo the sugar intake during dinner and save some room for dessert!
If you are dairy free, no worries, use our fabulous Hemp Parmesan (as pictured above) instead of regular Parmesan to add some healthy fats and clean protein. This is a flavor combo you will not want to miss! Apple, Squash, Leek Gratin (PRINT VEGETARIAN RECIPE) (PRINT VEGAN/PALEO RECIPE) Serves 6 Ingredients: 3 tablespoons grapeseed oil 2 leeks, white part only, thinly sliced crosswise, washed well and drained 2 tablespoons water ½ teaspoon coarse salt ¼ teaspoon freshly ground pepper ½ cup dry cooking sherry 1 tablespoon chopped fresh sage leaves, plus whole leaves for garnish 1 pound butternut squash, peeled, seeded, and cut into 1/8-inch-thick slices 1 pound organic apples, such as Gala or your favorite, cored and thinly sliced ½ cup grated Parmesan (2 ounces) OR 1/2 cup Dairy Free Hemp Parmesan (PRINT RECIPE) Directions:
Happy November Friends! Enjoy! ~Billie & Jennifer Grain Free. Vegan. Mostly Raw. Bursting with Flavor. 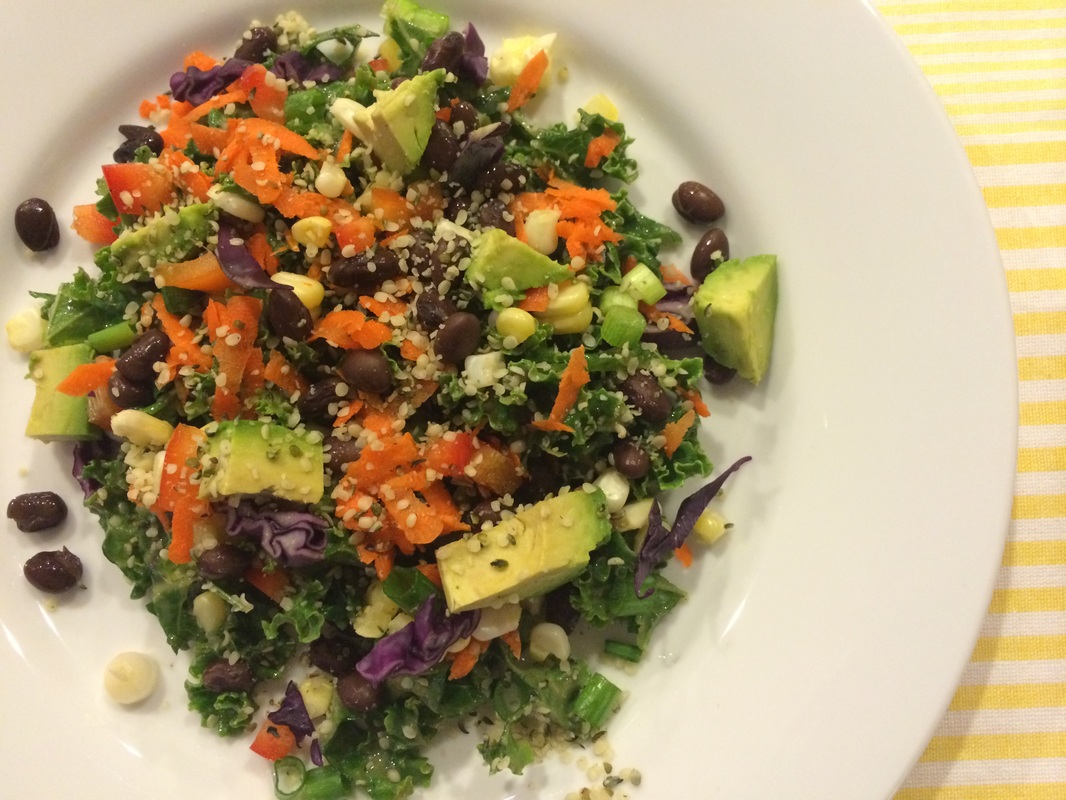 Jen and I made up this recipe for the first time last summer and it has been a favorite in both our households ever since. This salad is delicious and you can make it almost year round for a nutrient dense meal that fills you up without slowing you down. This salad is packed with 15.4 grams of protein and superfoods like kale, hemp seeds, cabbage, and avocado to replenish your antioxidants, nourish your immune system, and give you more energy.
If you've never tried a raw kale salad before then this is great recipe to get started with. I know what some of you are thinking...raw kale tastes really bitter, right?! Actually, the secret to a good raw kale salad is letting the chopped kale leaves marinate in the dressing for 15-20 minutes (or more) while you prepare the rest of your meal or sit down and enjoy a cocktail. The vinegar in the dressing will work to break down the tough, fibrous leaves of the kale, leaving you with a surprisingly amazing combination of flavors to enjoy! Just trust us on this one. My husband doesn't like to have salad as meals, but this is one he asks for regularly. Once you get it all mixed together and take your first bite, you will be hooked! This salad also keeps really well (won't get soggy like most leftover salads) for a great lunch the next day. If you are following our Anti-Inflammatory Eating Plan, we've designed a version for you as well that eliminates the soy and the beans and reduces net carbohydrates, PRINT ANTI-INFLAMMATORY VERSION HERE. Kale Refresh Salad with Tahini Dressing (PRINT RECIPE) Serves 4 Salad Ingredients: 1 bunch kale, stems removed, washed and finely chopped 2 ears fresh sweet corn or 1 cup thawed, frozen corn 1 (15-ounce) can black beans, drained and rinsed 1 red bell pepper, chopped ½ carrot, grated 1 small white or yellow onion, chopped ½ cup shredded cabbage 1/3 cup raw sunflower or hemp seeds 1 avocado, chopped Dressing Ingredients: ¼ cup white miso paste 3 tablespoons low sodium tamari or soy sauce/or gluten free soy sauce or tamari 3 tablespoons maple syrup 2 tablespoons olive oil 3 tablespoons tahini 2 tablespoons apple cider vinegar 2 tablespoons seasoned rice vinegar Pinch black pepper ½ teaspoon coriander Pinch of cayenne Directions:
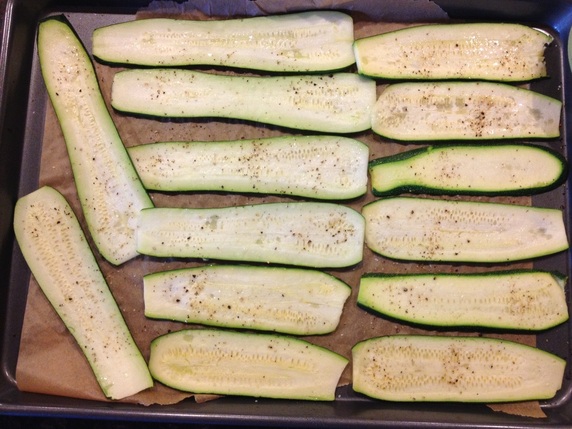
We hope you enjoy this recipe as much as our families do! Happy eating! ~Billie & Jennifer Grain Free. Vegan & Vegetarian Versions. Anti-Inflammatory. Delicious. 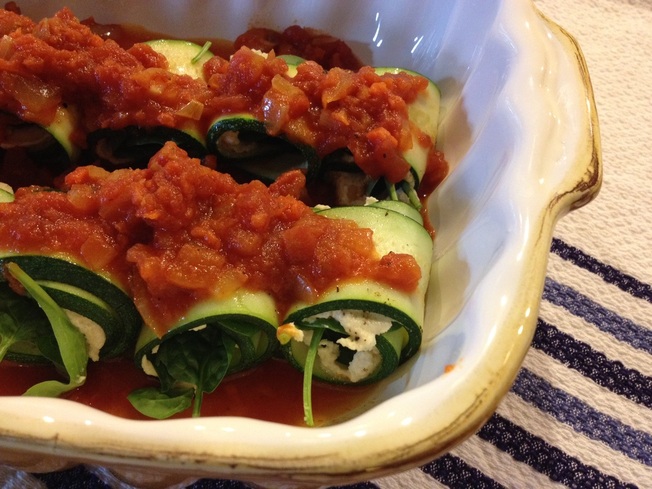 So... I still have lots of zucchini coming out of my garden...and I love it...there is just something so wonderful and fulfilling about walking outside your house and picking food straight off the vine from your yard! This year I especially love zucchini since it makes such a great low carb substitute for pasta and noodles! It inspired me to create this recipe with super simple and fresh ingredients. It is sure to be a hit on any dinner table and we have a dairy free/vegan version for those of you who are not friends with dairy. Easy Zucchini & Spinach 'Lasagna' Rolls Print Vegetarian Version Print Vegan & Anti-Inflammatory Version Serves 4 Ingredients: 3 medium zucchinis, sliced in half lengthwise Cooking spray (grapeseed or olive oil) Salt & Pepper ½ yellow onion, diced ½ red bell pepper, diced 2 cloves garlic, minced 5 ounces baby spinach 1 cup ricotta (OR for vegan and anti-inflammatory version substitute 1/2 Recipe Cashew Cheese) 2 cups jarred, organic marinara sauce** **If you are sensitive to nightshade vegetables, you could substitute marinara for pesto or mushroom sauce. If using pesto, just wait to put the sauce on until the last 5 minutes of cooking time. Directions:
 4. While the zucchini cooks, spray the bottom of a medium saucepan with cooking spray and place it over medium heat. Then add the garlic, onion, and bell pepper and sauté until onions are translucent, about 4 minutes. 5. Pour the marinara sauce into the saucepan and mix well to combine. Let simmer over medium-low heat until zucchini comes out of the oven. 6. Spread ¼ cup of marinara over the bottom of a 9 x 13 casserole dish. 7. Smear a scant tablespoon of ricotta or cashew cheese on one end of each zucchini roll slice, drop a small handful of spinach leaves on top of the cheese and then roll up, starting with the cheese side first. 8. Place rolls seam side down in the casserole dish. 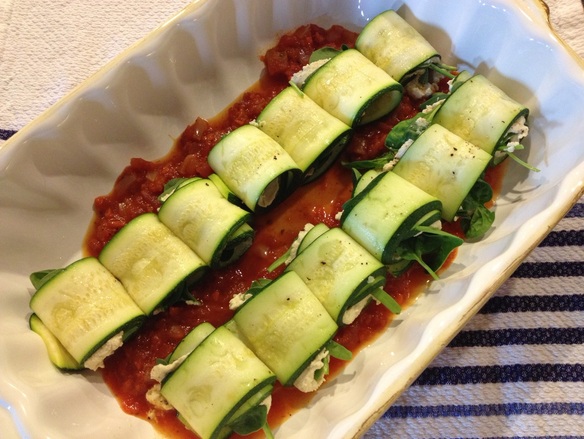 9. Smother with remaining marinara sauce and bake for 15-20 minutes.
10. Serve hot and enjoy! Happy Eating! ~Billie Grain Free. Vegetarian & Vegan Versions. Low Carb. Super Good. 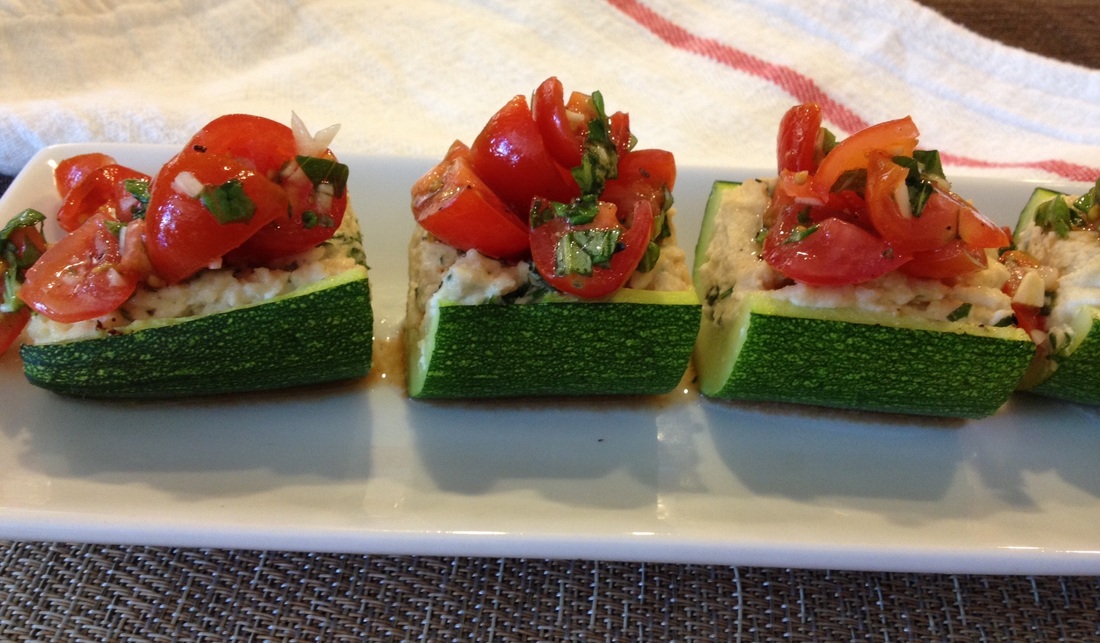 This recipe was created out of desperation to use up all my garden zucchini and to take advantage of the amazing fresh tomatoes that are available right now. One of my favorite all time appetizers is fresh bruschetta and after going gluten free a few years ago, I would still make this favorite with gluten free bread to get my fix. But this year I've been eating a mostly grain free diet as I go through treatment for Lyme disease and am always looking for ways to eat my old favorites without the grains.
I love making my zucchinis into noodles as a substitute for pasta, so I thought, why not try zucchini as a substitute for bread?! I also added a touch of creaminess that helps the fresh flavors of the tomato, basil, and garlic topping really stand out. Check it out for yourself - you will not be disappointed! Creamy Zucchini Boat Bruschetta (PRINT RECIPE) Serves 4-8* Ingredients: 4 medium zucchini Cooking spray 3 large basil leaves, minced ¼ cup parsley, minced 1 cup fresh ricotta cheese (Substitute 1 cup Cashew Cheese for Vegan Version) ¼ teaspoon salt ¼ teaspoon pepper 1 tablespoon lemon juice Topping: 1 pint cherry tomatoes, diced 5 cloves garlic, minced 6 large basil leaves, minced Juice of ½ of a lemon 2 tablespoons olive oil Pinch of salt and pepper Directions:
*Two zucchini boat halves make a great light meal paired with a side mixed green salad or one zucchini boat half per person makes for a nice appetizer. Happy Eating! ~Billie Raw. Vegan. Grain Free. Gluten Free. Soy Free Version. Incredible. 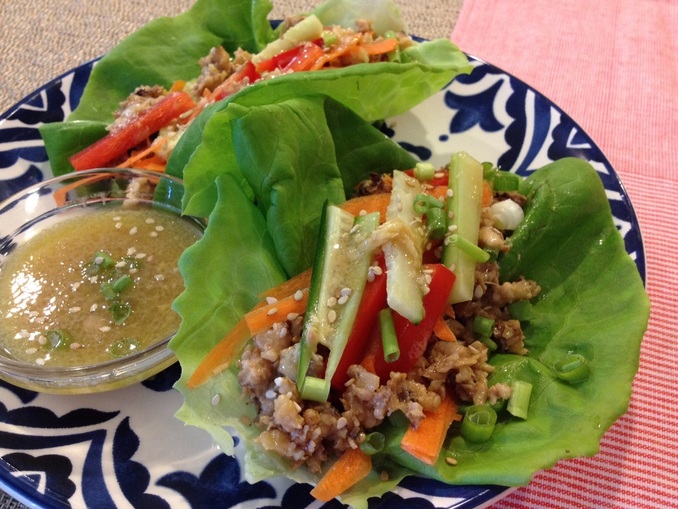 To me these lettuce wraps are reminiscent of the infamous PF Chang's chicken lettuce wraps...seriously...they surprisingly carry most of the same delicious flavors and textures and really hit the spot! I had tried walnut-lentil tacos before and LOVED them, but I was skeptical about just using walnut meat alone...enter this delicious recipe introduced to me by my lovely business partner and co-author, Jennifer Brown. Another plus, they come together in under 30 minutes with no oven necessary and the leftovers taste great for a few days to follow.
I made this batch with carrots, bell peppers, and cucumbers as my veggies, but you could add or substitute celery, bean sprouts, zucchini, or avocado here just as easily. We've also added our Miso-Ginger Dressing that is a must have pairing to this satisfying dish. While this meal might look light, it is packed with nutrient dense foods rich in healthy fats that will keep you feeling fuller longer. You can learn all about the health benefits of walnuts on our blog, Health Benefits of Walnuts. Asian Walnut Lettuce Wraps with Miso-Ginger Dressing (PRINT RECIPE) Serves 4; Serving Size 2-3 lettuce wraps Ingredients: 2 cups raw walnuts 4 teaspoons soy sauce or tamari (gluten free soy sauce or tamari if needed)* 1 inch fresh ginger root, peeled and minced or grated 2 tablespoons olive oil 2 cloves garlic, minced 1 tablespoon sriracha or chili garlic sauce 2 tablespoons maple syrup ½ teaspoon sesame seeds 1 head Boston or Bibb lettuce (sub iceberg/chard if you can’t find) 3 carrots, shredded ½ red bell pepper, thinly sliced 2 scallions, chopped Sesame seeds for garnish Directions:
We hope you enjoy these as much as we do! Happy eating! ~Billie & Jen *For soy-free version substitute coconut aminos for soy sauce or tamari and use Sesame-Ginger Dressing (Click here for recipe). Raw. Vegan. Grain Free. Low Carb. Amazing. 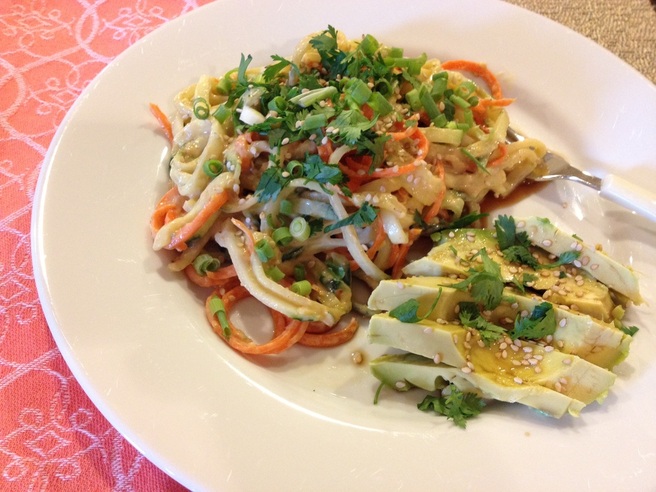 This has been one of my favorite go-to recipes for the last few weeks since cucumbers are so abundant right now. In fact, this recipe is so good, today is the fourth time I've made this in the last 2 weeks. And so...I'm inspired to share it with you...and I hope you will share it with others!
With ingredients like ginger, garlic, cucumbers, carrots, cilantro, lime, and green onions - this meal will help to alkalize and detoxify your body, leaving you feeling refreshed and renewed! It's also filled with healthy fats like sesame oil, peanuts, and avocados to nourish your immune system and support good cardiovascular health. Plus cucumbers are packed with antioxidants, B vitamins and phytonutrients to boost nutrition- head on over to our blog, Health Benefits of Cucumbers , to learn more. Cucumber & Carrot Noodle Salad with Peanut or Almond Dressing (PRINT RECIPE) (PRINT ANTI-INFLAMMATORY RECIPE) Serves 4 Salad Ingredients: 3 large cucumbers, peeled 1 large carrot, peeled ¼ cup fresh cilantro, chopped 4 green onions, diced ¼ cup peanuts, chopped Peanut or Almond Dressing: ¼ cup peanut butter (almond butter for anti-inflammatory version) 2 tablespoons water 1 tablespoon rice vinegar 1 tablespoon soy sauce or tamari (coconut aminos for anti-inflammatory version) 1 inch ginger, grated 1 clove garlic, minced Zest & juice of one lime 2 teaspoons maple syrup 1 teaspoon sesame oil Directions:
If you can't do nuts or want a lighter dressing, try our Sesame-Ginger Dressing with this salad instead. Sesame Ginger Dressing: 2 1/2 tablespoons olive or flax oil 1/2 tablespoon sesame oil 2 tablespoons rice wine vinegar 1 tablespoon sesame seeds 1 teaspoon coconut aminos 1 teaspoon honey 1/2 teaspoon grated ginger Jen and I like to serve this salad with our Avocado Boats (PRINT RECIPE) on the side - it makes for a perfect combination of flavors and textures, and of course adds a great serving of healthy fats. Seriously...a MUST TRY RECIPE this summer! Please post back and let me know how you like it! Happy eating! ~Billie **If you need a good spiral slicer, they are super handy when you want to eat low carb and gluten free. I use a product called Gefu (click here to see details) that I really like, it's easy to use. Or there is a product called Veggetti (this is an 'as seen on tv product)- I've not used it, but know a few people who have and say it works just the same as the Gefu. Hope this is helpful. Grain Free. Vegan & Vegetarian Versions 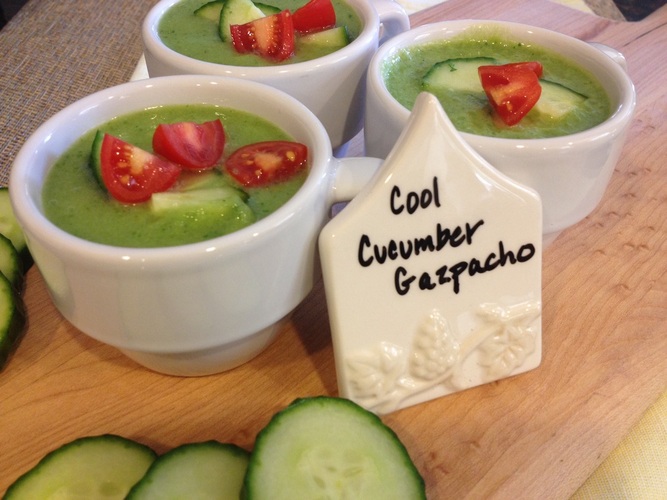 This light and refreshing summertime soup makes for a great appetizer or side dish and comes together in under 15 minutes. The flavors stand on their own and you can't help but be quenched and cooled down a bit when you take a sip of this gazpacho. You can even embrace the rock-star entertainer you are by serving it in small shot glasses or espresso cups for a beautiful presentation and that extra touch of sophistication!
Or simply pair it with your favorite salad or sandwich for a lightweight lunch or dinner. Try it with our Adzuki Bean & Quinoa Tossed Salad. This soup is under 100 calories per serving since cucumbers are 95% water based, but don't let that fool ya into thinking you are not getting enough nutritional value. While low in calories, cucumbers are high in both B & C vitamins as well as potassium and vitamin K and offer detoxifying and anti-inflammatory properties. Having one bowl of this soup will help to re-hydrate your body, increase your energy, and improve your body's ability to cleanse and detoxify. Plus it tastes AMAZING! To learn more, check out our blog, Health Benefits of Cucumbers. Cool Cucumber Gazpacho (PRINT RECIPE) Serves 4 Ingredients: 3 cups chopped English/hot house cucumbers (about 2 large cucumbers) ½ cup low sodium vegetable broth 1 cup full fat organic coconut milk from a can ¼ cup chopped white onion 2 tablespoons fresh lime juice (about 1 large lime) 1 clove garlic ½ teaspoon salt ¼ teaspoon ground black pepper Dash of cumin Dash of ground red pepper 1 cup grape or cherry tomatoes, quartered Directions:
I really like this soup chilled, so I recommend putting it in the fridge for at least 15 minutes before serving it. You can make this soup into a heartier snack or light meal by adding some pepitas, hemp seeds, and/or avocado slices as a garnish as well. This soup will stay fresh in the fridge in an airtight container for up to 3 days. Enjoy! ~Billie Vegan. Grain Free. 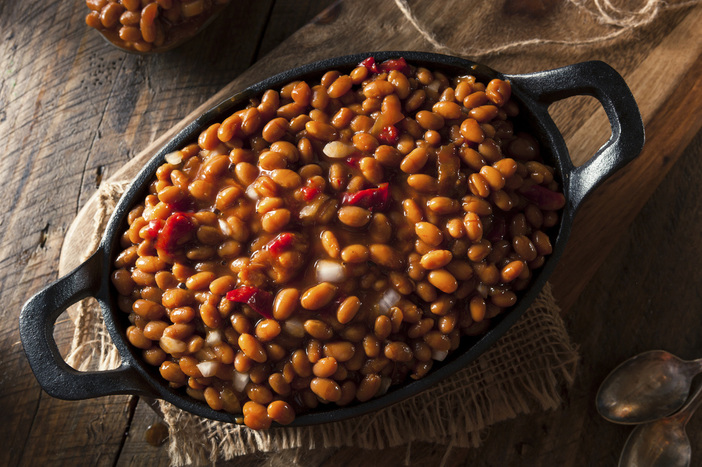 Perfect for the upcoming 4th of July festivities...these beans make a great side dish for any of your favorite BBQ dishes! I love to serve these with BBQ chicken and coleslaw - YUM!! If you are a non-meat eater, these taste delicious as a main meal poured over creamy polenta or a baked potato or alongside BBQ Tempeh Skewers. Many baked beans recipes rely on bacon fat for the deep, savory flavor. Our healthier version pairs the sweetness of blackstrap molasses with the savoriness of stewed tomatoes, onions, and green bell peppers and the end result is a flavorful dish that will have your guests going back for seconds. When I first made this dish last year at a BBQ we hosted at our house, everyone went home raving about these BEANS! Now I'd like to share this recipe with you!
Blackstrap Beans (PRINT RECIPE) Serves 4+ Ingredients: 1 large yellow onion, chopped 1 green bell pepper, chopped 3 cloves garlic, minced 1 (14.5-ounce) can diced tomatoes or (6-ounce) can tomato puree ½ cup vegetable stock ¼ cup blackstrap molasses 1 ½ tablespoons apple cider vinegar 1 tablespoon Worcestershire sauce 1 teaspoon spicy brown mustard ½ teaspoon salt ½ teaspoon black pepper 2 cups cooked beans of choice* (Great northern, cannellini, pinto, kidney or a combination all work great here.) *From 1 cup dry beans OR 1 1/2 (15-ounce) cans Directions:
Super easy...full of flavor...love, love, love! We hope you all enjoy a lovely 4th of July celebration this week in the company of friends, family, and laughter! Happy Eating! ~Billie & Jen Grain Free & Vegan 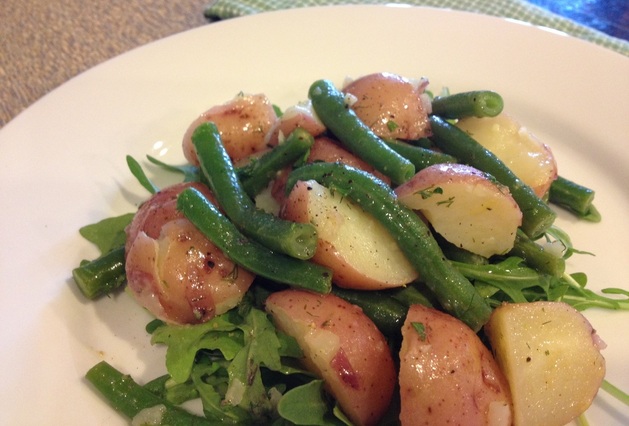 The tastes of summer are present in this hearty side dish...fresh green beans, baby red potatoes, arugula, lemon, and fresh dill. YUM!! This comes together in under 40 minutes and tastes great served warm or at room temperature. It makes for a great option for a summer brunch or BBQ!
Baby Red Potato & Green Bean Salad with a Lemon Dijon-Dill Dressing (PRINT RECIPE) Makes 4+ servings Salad Ingredients: 1 pound baby red potatoes 1 pound green beans or haricots verts, ends trimmed 4 cups baby arugula Lemon Dijon-Dill Dressing Ingredients: Juice and zest of one lemon 1 clove garlic, minced 3 tablespoons extra virgin olive oil 1 teaspoon Dijon mustard 2 tablespoons fresh dill, chopped 1 tablespoon fresh parsley, chopped ½ teaspoon salt ½ teaspoon black pepper Directions:
Happy Eating! ~Billie & Jen Gluten Free. Vegan & Soy Free Versions. Anti-Inflammatory. 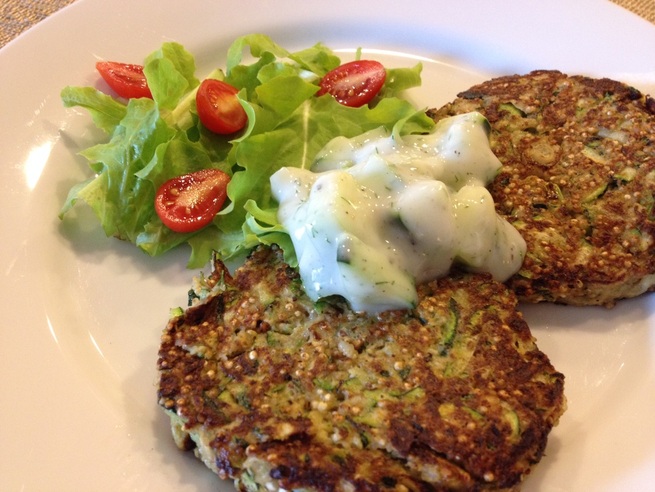 These patties may just become one of your favorite summer go to meals. We've used finely ground raw quinoa and walnuts in place of breadcrumbs here to give you a low carb meal that is high in protein as well. We like to soak the quinoa while we prepare the rest of the meal - this can make it a little easier for the tummy to digest. This is what your quinoa-walnut meal should look like after processed. 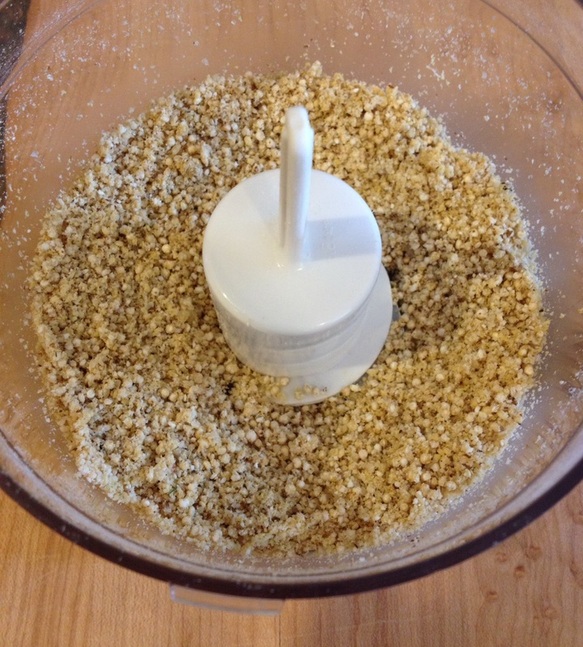 These patties are actually pretty filling on their own, so we recommend pairing them with something light like mixed greens or crispy kale. You will grate the zucchini and then let it sit in a colander to sweat out its extra moisture. The batter will be wet and you will not be able to form patties with it easily. We recommend placing the batter in the fridge for 10-20 minutes if you have time prior to cooking to help it stick together. To make your patties, simply, use a 1/3 cup measuring cup and scoop out the batter, then place the mound in a hot skillet and smoosh into a pattie using a spatula. Check out the rest of the ingredients and directions below...
Zucchini-Quinoa Patties with Tzatziki Sauce (PRINT RECIPE) Serves 4 (PRINT VEGAN RECIPE) (PRINT DAIRY FREE RECIPE) (PRINT ANTI-INFLAMMATORY RECIPE) (gluten free, dairy free, soy free) Directions: 1/2 cup uncooked quinoa 1/2 cup raw walnuts, chopped 3 medium zucchini, grated (about 4 ½ cups) 1/2 teaspoon salt, divided 3 green onions, thinly sliced 3 tablespoons fresh dill 1/2 teaspoon pepper 1 egg, lightly beaten 1-3 tablespoons ground flax seed or almond meal 2 tablespoons grapeseed oil, divided Tzatziki Sauce: 1 cup plain Greek yogurt or non-dairy yogurt for our vegan friends 1 tablespoon fresh dill or 1 teaspoon dried 1/2 medium cucumber, peeled and diced 1 ounce feta cheese, crumbled (optional) 1 garlic clove, minced Juice of half a lemon 2 teaspoons apple cider vinegar (vegan version only) Salt and pepper to taste Directions:
Enjoy! ~Billie & Jennifer Vegan, Gluten Free, Anti-Inflammatory 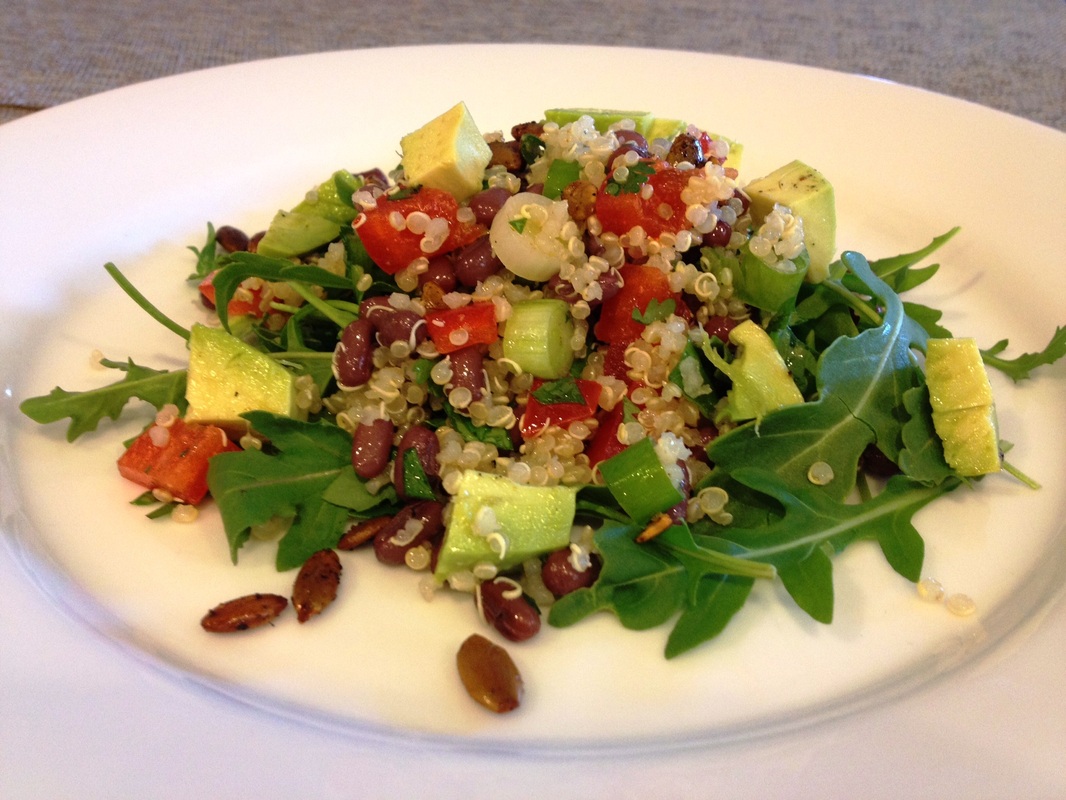 Nutrient dense foods like Adzuki beans, quinoa, pumpkin seeds, avocado, and arugula come together to make this super simple salad that will keep you feeling "surprising full". At least those were the words my husband uttered after eating what looked to him to be rabbit food for his dinner :)
The cumin-lime vinaigrette brings the nutty and sweet flavors together and is best served over a bed of arugula or other mixed greens of choice. I like to pair this dish with a cold soup in the summer months - like gazpacho, creamy of celery, or cold avocado soup. Adding some roasted sweet potatoes on the side would be another great way to bulk up this meal. This salad makes great leftovers for a easy lunch at work the next day. Just stir and then add fresh avocado slices and arugula when you are ready to eat. You can also learn more about the health benefits of adzuki beans and how to cook with them on our blog post, The Amazing Adzuki Bean! Adzuki Bean & Quinoa Tossed Salad (PRINT RECIPE) Serves 4 Ingredients: 1 (15-ounce) can adzuki beans, drained and rinsed (or 1/3 cup dry beans)** ½ cup dry quinoa ¼ teaspoon ground cumin ½ small red bell pepper, diced ¼ cup cilantro, minced 2 scallions, thinly diced ¼ cup pumpkin seeds, toasted 1 ripe avocado, diced 4 cups arugula or mixed greens of choice Cumin-Lime Dressing: 3 tablespoons olive oil 1 tablespoon apple cider vinegar Juice of one lime ¼ teaspoon ground cumin ¼ teaspoon cayenne 1 teaspoon honey or agave Directions:
Enjoy! ~Billie & Jen Vegan & Gluten Free 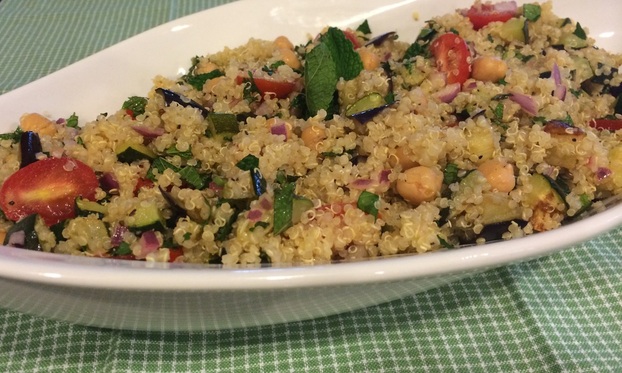 This lovely dish comes comes together in 45 minutes and is loaded with protein and lots of amazing veggies, making it a filling main course or an excellent side dish to any summer meal or celebration. It is also a beautiful presentation with lots of color for your table setting.
We've used roasted eggplant and zucchini here, but feel free to change up the veggies to suit your own taste. Asparagus, roasted tomatoes, or artichokes would all work well in this recipe. You could also skip the roasted veggies and do diced cucumbers instead for an even lighter taste. Roasted Vegetable Tabbouleh We hope you enjoy! ~Jennifer & Billie Grain Free. Soy Free. Vegetarian. Vegan. Anti-Inflammatory 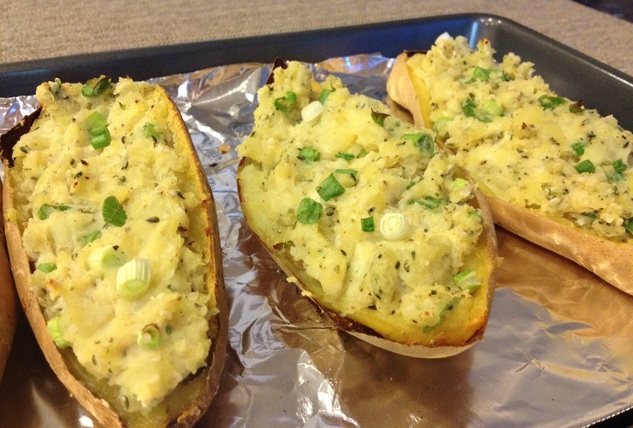 This is a new spin on twice baked potatoes that packs a flavorful punch! I prefer to use white skinned sweet potatoes in this recipe, but if you can't find them then russets will work just as well.
These stuffed potatoes can easily stand alone as a main dish because they are packed with protein (7 grams) and fiber (8 grams) as well as a nice dose of healthy Omega 3 and 6 fats. Many of these health benefits mostly come from the hemp seeds. In fact hemp seeds are 33% protein and contain all 9 essential amino acids- you can check our blog, Health Benefits of Hemp Seeds, to learn more about one of natures best and most versatile seeds. Herb & Hemp Stuffed Potatoes: (PRINT RECIPE) Serves 4 Ingredients: 4 medium white skinned sweet potatoes* 1-2 tablespoons organic miso paste (leave out if you are soy free and increase salt to 1 teaspoon) 1/4 cup raw cashews 3 tablespoons nutritional yeast 2 tablespoons lemon juice 1 tablespoons olive oil ½ teaspoon salt ¼ teaspoon pepper ½ cup chives or green onions, finely diced ¼ cup parsley, finely diced ½ cup raw hemp seeds Directions:
***To cut out 15-20 minutes cook time and get this meal on the table quicker, you can pre-cook your potatoes in the microwave for 5-7 minutes before putting them in the oven (if you are ok with using the microwave...if you are not, I totally get it). Just pierce with a fork and wrap in a tea towel or paper towel first. Enjoy! ~Billie Gluten Free. Vegan. Soy Free and Low Carb Version Available. 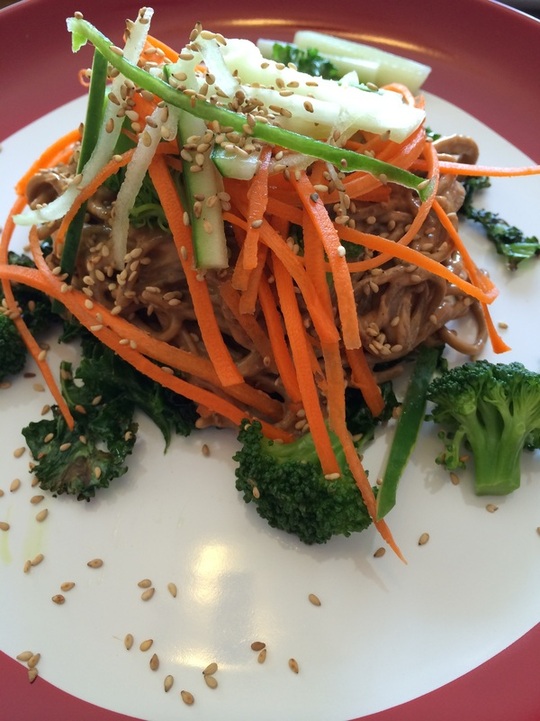 This past weekend Billie and I were lucky enough to be able to get our families together for lunch, which doesn't happen very often right now. I needed something fast but fun, so in celebration of some better weather (finally!) I broke out this tried and true recipe that never disappoints. I served it with avocado slices drizzled with sesame oil and tamari, and everyone went away satisfied!
This is a super versatile dish full of flavor that the whole family can enjoy. My kids (the pickiest eaters EVER) even eat these noodles with smiles on their faces and steamed broccoli on the side which makes me super happy! As a bonus, it also makes for a lovely table presentation if you are hosting a dinner or lunch - everyone will think you spent hours on it when it really only involves about 30 minutes in the kitchen. I love to serve this dish over a bed of greens - here I used our Crispy Kale recipe. You can make the noodles ahead of time if you want- they taste just as good at room temperature or even cold as they do hot. I used 100% buckwheat soba noodles since our guests were gluten free, but you can also use lo mein or even brown rice spaghetti noodles instead and it will still be fabulous! Feel free to change up the veggies to match your taste and with the seasons. Bell peppers, snow peas, or zucchini would all be nice choices here as well. Peanut Sesame Noodles (PRINT RECIPE) (PRINT GLUTEN FREE) (PRINT ANTI-INFLAMMATORY) Serves 4 Ingredients: 8 ounces lo mein noodles** Small head broccoli, cut into florets 1 large carrot, cut into matchsticks ½ cucumber, cut into matchsticks 1/3 cup peanut butter 3 tablespoons water 3 tablespoons maple syrup 1 tablespoon seasoned rice vinegar 1 tablespoon soy sauce or tamari/gluten free soy sauce/coconut aminos 1 tablespoon hoisin sauce 1 tablespoon tomato paste 1 teaspoon sesame oil 1 tablespoon sesame seeds Directions:
**If you are gluten, dairy, soy free and low carb, try out Ant-Inflammatory Version - we substitute shiritaki noodles or zucchini noodles instead of soba noodles or lo mein. Enjoy and let us know what you think! ~Jennifer |

Billie Shellist, FDN-P
I practice functional nutrition, an approach that allows me to look at your entire health history and help you find the "root causes" of your chronic health complaints. This cuts out the trial and error process and helps you get real symptom relief and resolution! Food is medicine and knowledge is power -I hope you enjoy my anti-inflammatory recipes which are gluten, dairy, and soy free as well as very low grain and sugar. If you'd like to heal from the root cause(s) of your chronic symptoms, try starting with a complimentary 15-minute consultation. Click here to request your free session. |
|
Copyright 2024 Functional Diagnostic Healing. All rights reserved. Professional photography by Priscilla Durkin- www.priscilladurkin.com Privacy Policy - Legal Notice |