
|
Gluten free. Grain free. Vegan. Nut-free version. 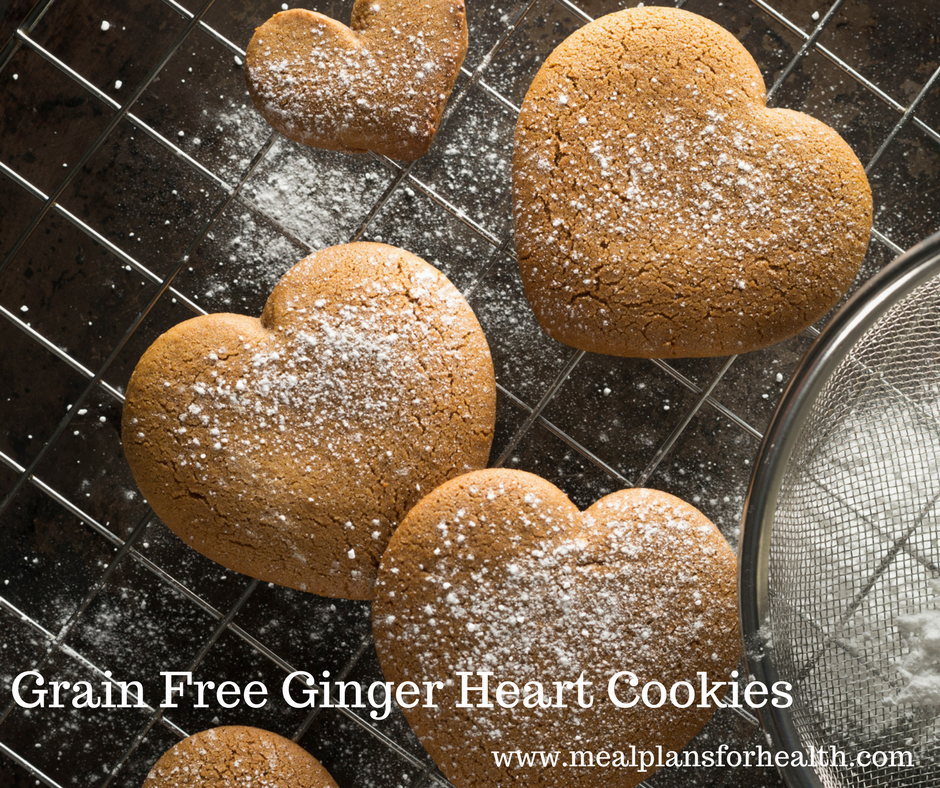 I usually make ginger cookies during the holiday season, but this week I was inspired by our upcoming Valentine's Day to make a slightly different version and would like to share it with you today.
Even when I eat sweet treats like these, I'm careful to choose ingredients that help reduce inflammation in the body...the star in this recipe of course is GINGER! Ginger is one of the most powerful medicinal foods available and has been used for centuries to help support digestion, reduce inflammation, aid in healing, and increase circulation. In fact, because it can helps to increase circulation, ginger has been touted as a powerful aphrodisiac...making it perfect for a Valentine's Day celebration with your significant other or friends! Check out this simple recipe... Grain-Free Heart Shaped Ginger Cookies (PRINT RECIPE) Makes about 16 cookies Ingredients: 1 1/2 cups blanched almond flour/almond meal (substitute cassava or tiger nut flour for nut free version) 2-3 tablespoons coconut oil, melted (sub avocado oil or organic ghee) 1/4 cup 100% pure maple syrup or organic cassava syrup 1 tablespoon blackstrap molasses 2 teaspoons ground ginger 1/8 teaspoon fine sea salt 1/4 teaspoon baking soda Directions:
I hope you enjoy these cookies as much as my family and I do. Happy Valentine's Day! Let me know what you think by commenting below - I'd love to hear your feedback! ~Billie
0 Comments
Grain free. Gluten free. Soy free. Dairy free. Low Carb. Low Sugar. 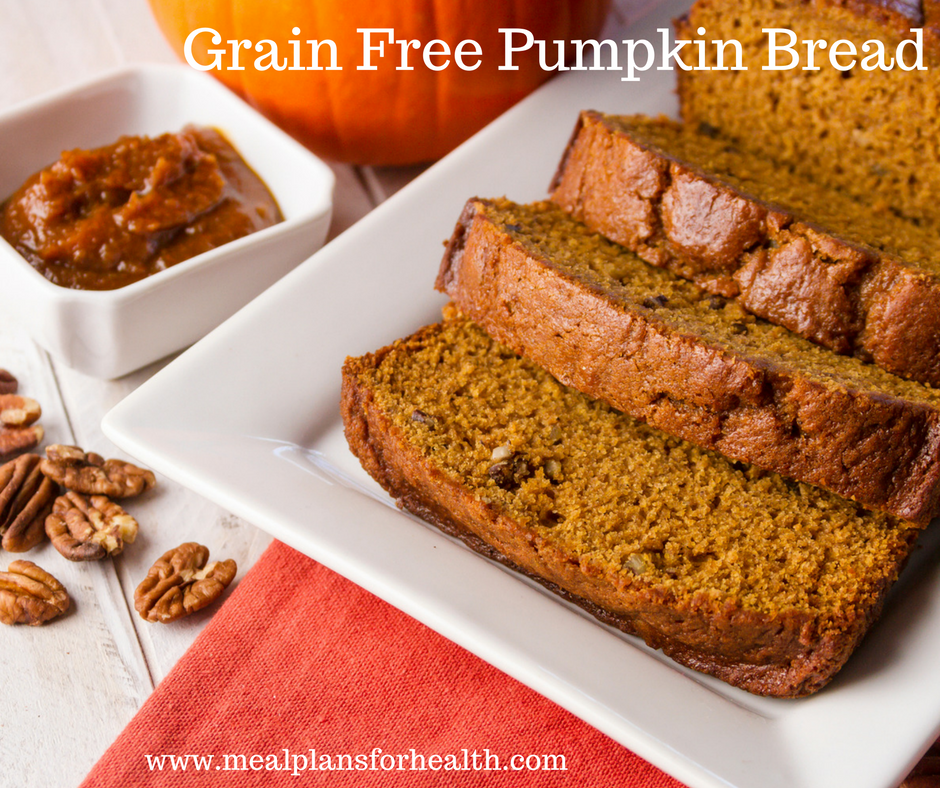 This delightful bread is low in sugar but high in flavor and deliciousness and highlights one of my favorite seasonal foods - pumpkin!! Pumpkin used to be a year round food for me until I learned I had a histamine intolerance which made me sensitive to foods like pumpkin and cinnamon. So this whole year I've excluded these items from my diet, which has been challenging for me but has paid off. And now that Fall has arrived, I'm treating myself to some of my favorite pumpkin recipes in small amounts and wanted to share some with you:)
This bread is super versatile and can be made into a dozen muffins if you prefer. I recommend adding your favorite "crunch" to this bread –I love walnuts because they are a healthy source of omega-6 fats and have been shown to be neuro-protective for the brain, but pecans or hazelnuts could also work well in this recipe. Or for a special treat every once in awhile, add 1/3 cup dark or vegan chocolate chips or even some craisins or raisins. For more recipes like these, check out our Anti-Inflammatory Holiday Cookbook with over 20 holiday recipes, plus a holiday meal plan that can save you time and stress! ON SALE NOW -- MONDAY 10/31. Grain Free Pumpkin Muffins: (PRINT RECIPE) Serves 12 Ingredients: Heaping ½ cup 100% pure pumpkin puree ¼ cup coconut flour* 1 ½ cups blanched almond flour or almond meal 1 teaspoon baking powder ½ teaspoon baking soda ½ teaspoon salt ½ teaspoon ground cinnamon ½ teaspoon ground ginger 1 teaspoon pumpkin pie spice 3 large organic, pastured eggs 3 tablespoons coconut palm sugar* 2 tablespoons maple syrup 1/3 cup coconut oil, melted (can sub melted ghee or avocado oil here instead) 1 teaspoon pure vanilla extract *If you are sensitive to coconut, try using 1/3 cup tiger nut flour or quinoa here instead and swap the coconut sugar for additional maple syrup.* Optional Ingredients: (Choose one) 1/4 cup chopped nuts (walnuts, pecans, or hazelnuts work well) 1/3 cup dark or vegan chocolate chips Directions:
p.s. - if you decide to make 12 muffins instead of bread, bake for 18-25 minutes or until a toothpick inserted in the center of the muffin comes out clean. Remove muffins from the tin but leave the muffin paper/wrapper on until completely cool. If you try to peel it too early, lots of the muffin will stick to the paper and it will be a mess! Enjoy! Billie Gluten Free. Grain Free. Paleo. Dairy Free. Soy Free. Nut Free 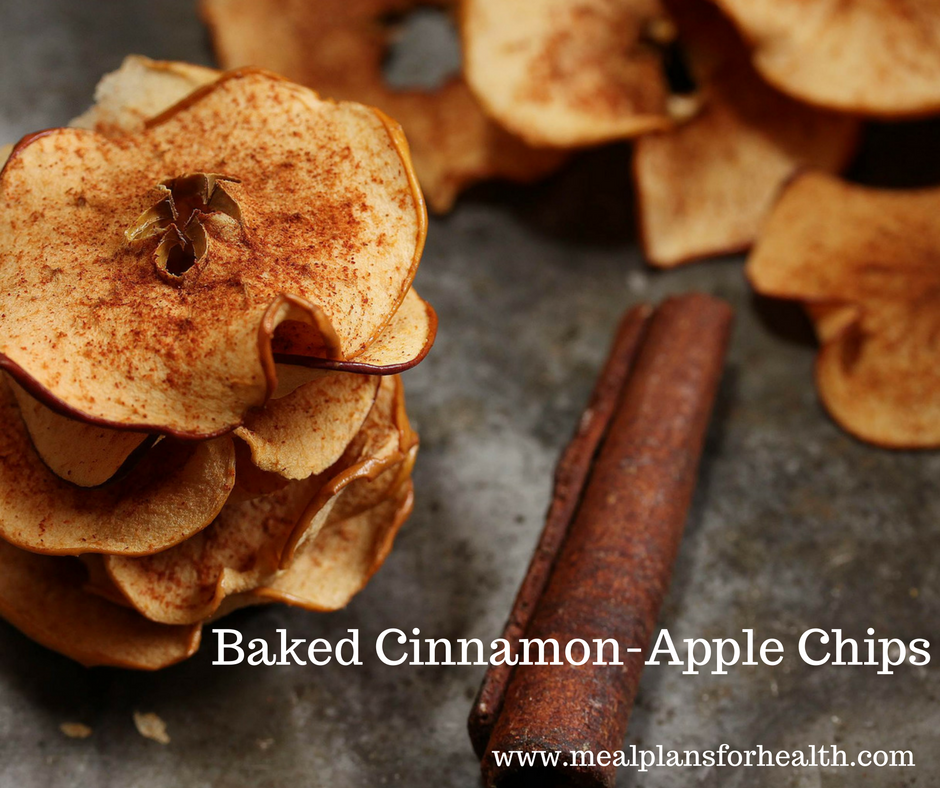 If you are looking for the ultra healthy sweet snack, try slowly baking sliced apples sprinkled with cinnamon to make apple chips. This recipe doesn't require a dehydrator, only an oven. These apple chips are the perfect snack on the go, ideal for kids lunches, and contain no added sugar - AWESOME SAUCE!
It's as simple as that! If you are ready to try some, follow the easy steps below and consider doubling the recipe since these may disappear very quickly:) Baked Cinnamon-Apple Chips (PRINT RECIPE): Serves 4 Ingredients: 2 large, organic apples of choice Ground cinnamon to taste Directions:
Let me know what you think friends! ~Billie Gluten Free. Dairy Free. Soy Free. Grain Free. Low Sugar. Low Carb.  If you've never tried chia seed pudding, you are missing out! This recipe is a highly nutritious and energizing way to start the day or get through an afternoon slump. Chia seeds are a low calorie, nutrient dense superfood that offer a great source of fiber, heart healthy omega-3 fats, and protein. Omega-3 fats are super important to get in each day in some way to help reduce inflammation and protect your heart and brain. You can learn more on my blog: Health Benefits of Omega-3 Fats.
This pudding takes 5 minutes to make and will set overnight. The chia seeds will absorb the liquid and expand into a pudding-like consistency. And because chia seeds are so high in fiber and protein, just one serving will really work to stabilize your blood sugar levels, reduce sugar cravings, and keep you feeling fuller longer. Chia seeds can be very energizing, so I like this as a snack in the afternoon when I'm feeling fatigued and craving something sweet:) The flavors and texture are very close to real chocolate pudding so you really feel like you are eating a sweet treat when this hits your mouth! Creamy Chocolate Chia Pudding (PRINT RECIPE): Makes 4 small servings Ingredients: 1 3/4 cups unsweetened non-dairy milk of choice Heaping 1/3 cup chia seeds 2 tablespoons organic unsweetened cocoa powder or cacao nibs ½ teaspoon ground cinnamon ½ teaspoon 100% pure vanilla extract 2 tablespoons raw honey, maple syrup, or coconut sugar/nectar Pinch of salt Optional Toppings: (choose one) ¼ cup shredded unsweetened coconut ¼ cup raw walnuts, almonds, or macadamia nuts 2-3 strawberries, 6 raspberries or 9 blueberries** Directions:
This keeps well in the fridge for about 3-4 days. So I like to make a batch at the beginning of the week and scoop out a snack in the afternoon! If you like simple, anti-inflammatory recipes like this one, check out our Anti-Inflammatory Meal Plans for a wide variety of easy meals and "make ahead" preparation plans. Let me know what you think about the pudding. What other types of chia pudding do you like? ~Billie Gluten free. Dairy free. Soy free. Nut free. Low sugar.  This is a perfect treat on a hot summer day! We use antioxidant loaded berries and touch of honey to make this super simple sorbet we know you will love! This is a great way to satisfy your sweet tooth or an ice cream craving without all the extra sugar and calories. I love using berries not only because they are packed with antioxidants but also because they are one of the few low glycemic fruits.
You do not need an ice cream machine for this recipe, all you need is a blender and 5 minutes of time, check it out... Simple Berry Sorbet (PRINT RECIPE): Makes 6 servings Ingredients: 2 cups frozen strawberries 1 cup frozen blueberries 2-4 tablespoons honey or agave 1 teaspoon lemon juice Pinch of salt Directions:
Feel free to get creative here and use your favorite fruit and fruit combinations. Some other flavor combinations I really like are: Mango-Mint, Peach, and Pineapple-Banana. Let me know what you think of this recipe and please share your creative versions! ~Billie Grain free. Gluten free. Dairy free option. 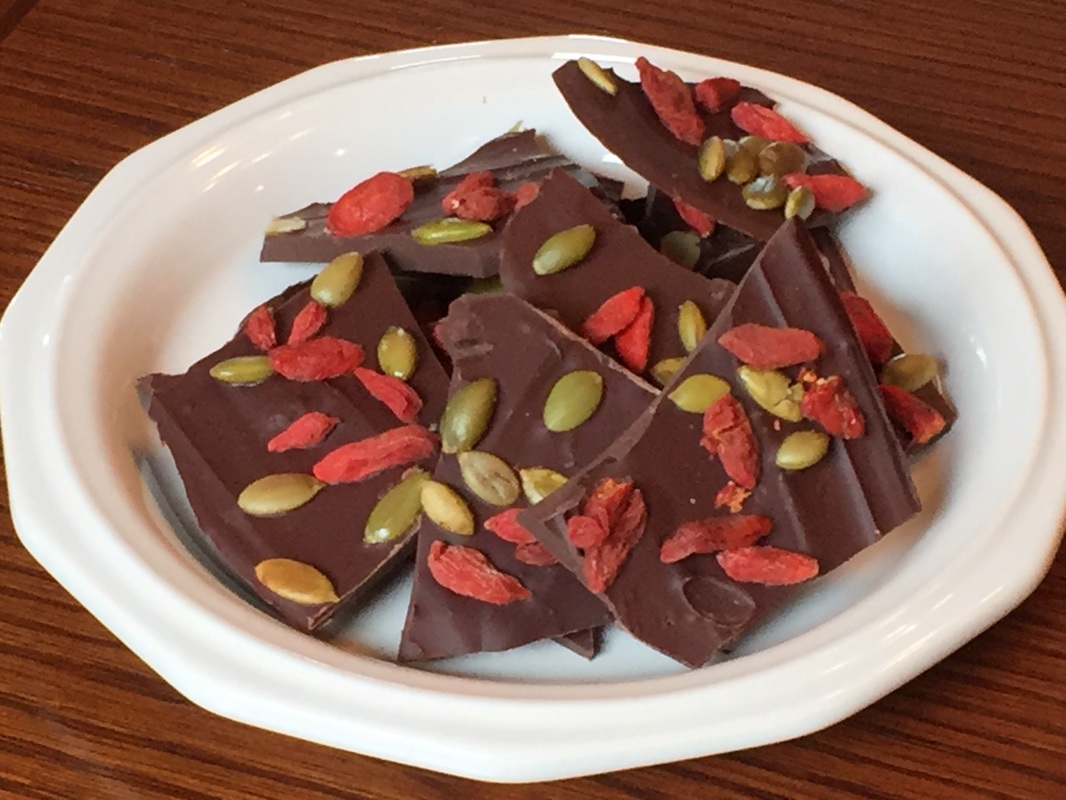 This recipe is a perfect way to make your own "candy-like" dessert at home. Dark chocolate bark is super simple to make and does not require an oven or a stove top. It only takes about 10 minutes of your time and you can customize this recipe to meet your taste buds. For example, instead of pumpkin seeds and goji berries try: shredded coconut, chopped almonds, walnuts, or macadamia nuts or some craisins. I like this combination because pumpkin seeds and goji berries are super-foods that are packed with additional antioxidants - always a good thing:) Enjoy...
Pumpkin Seed Goji Berry Dark Chocolate Bark (PRINT RECIPE) Makes 10-12 servings Ingredients: 1 cup dark chocolate chips or 1 (8-ounce) dark chocolate bar (70% or higher) or vegan chocolate chips/carob chips 3 tablespoons raw pumpkin seeds 3 tablespoons go-ji berries ¼ -½ teaspoon coarse sea salt (optional – for a salty-sweet taste) Directions:
Let me know what you think and what your favorite combinations are! ~Billie Dairy Free. Gluten Free. Soy Free. Low Carb. Low Sugar. 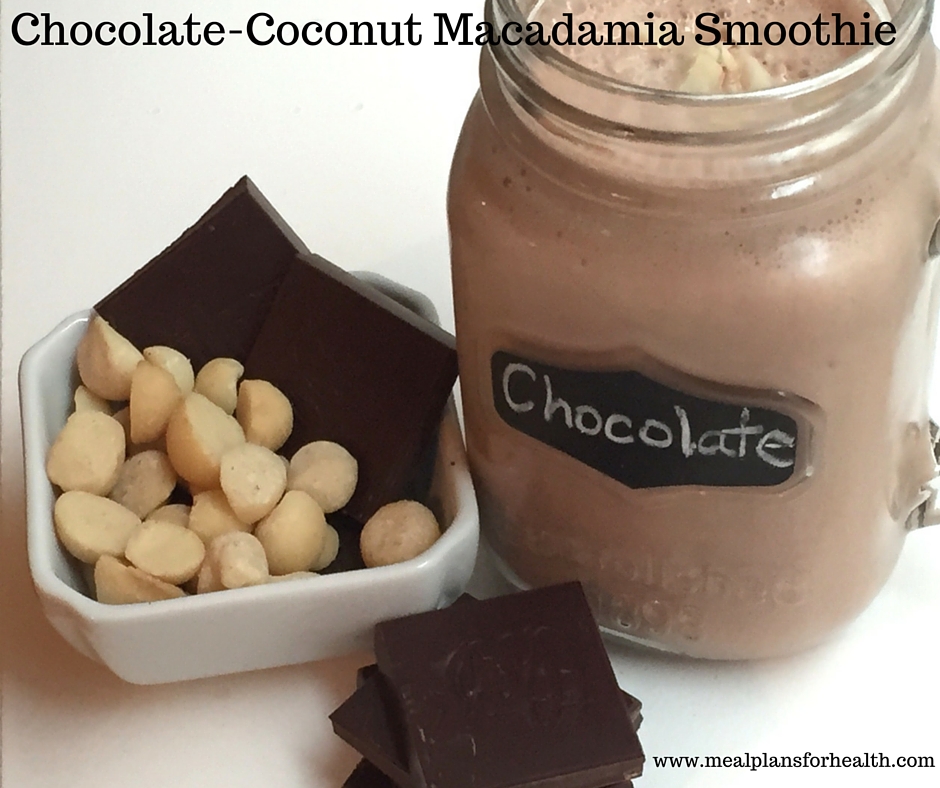 I'm enjoying one of these as I write this blog today! This is a very filling smoothie that I like to use when a sweet or specifically chocolate craving hits. It tastes like dessert but I'm getting lots of healthy fats, protein, and fiber to keep me feeling full and satisfied. Plus, it only has 4.1 grams of sugar and is under 10 grams of carbs per serving. If you can't do chocolate, leave it out and just do Coconut-Macadamia Smoothie:)
Macadamia nuts are a great source of monounsaturated fat, the same type of fat found olive oil and avocados. Monounsaturated fats are hailed as one of the best types of fat to prevent heart disease and several studies show that these healthy fats can also help improve insulin resistance and reduce the risk of diabetes. Stay tuned tomorrow when we share all about the health benefits of monounsaturated fats on our "What's That?! Wednesday post" plus give you a couple new recipes to help you incorporate these into your diet with ease and deliciousness. Chocolate-Coconut Macadamia Smoothie (PRINT RECIPE) Serves 2 Ingredients: 2 scoops unflavored, vanilla, or chocolate flavored protein powder of choice* Heaping 1/3 cup raw, unsalted macadamia nuts 1 heaping tablespoon raw, organic cocoa powder or raw cacao nibs 1 teaspoon ground organic cinnamon 2 tablespoons raw coconut butter or raw coconut manna (different from coconut oil) OR 1/2 cup of raw, frozen coconut chunks or shavings 1-2 tablespoons chia seeds (optional) for extra fiber boost 2 cups unsweetened non-dairy milk of choice (Coconut, Hemp, or Almond) 1-2 cups ice cubes depending on how thick & cold you like it Directions:
*Check out our blog, How to Choose a Protein Powder. And if you like recipes like these, check out our 10 Day Sugar Detox eBook - a 10 day clean eating guide to help you incorporate healthy foods and reduce your sugar and simple carb intake. Enjoy friends! ~Billie Sugar Free, Dairy Free, Gluten Free, Grain Free, & Low Carb 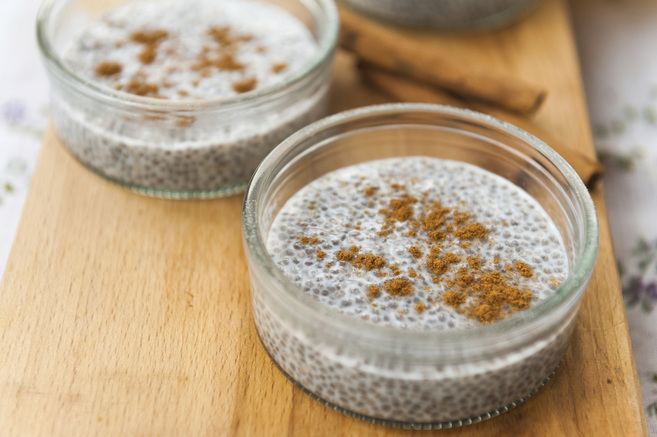 Chia seeds are a powerful super-food with healthy omega fats and energy boosting properties. They are packed with fiber and protein to keep you feeling full. Perfect for before or after a workout to boost your energy. Plus, cinnamon has been shown to help balance blood sugar and reduce cravings for sweets. So this is a great recipe to have handy when those sweet cravings hit and you want to make a healthy choice.
This is just 1 of over 30 clean, low-carb and naturally sugar-free recipes in our new eBook, 10 Day Sugar Detox. This 10 day clean eating plan will help you decrease the amount of sugar in your diet, boost your metabolism, and even help you lose weight. Most recipes can be make in 30-45 minutes and the eBook includes a weekly "make-ahead" preparation plan as well as grocery shopping lists to help save you time and stress! Cinnamon-Spiced Chia Pudding (PRINT RECIPE) (Makes 4 servings) Ingredients: 2 cups unsweetened almond milk or coconut milk 5-10 drops liquid stevia 1 teaspoon vanilla extract 1 teaspoon cinnamon ½ teaspoon ground ginger 6 tablespoons chia seeds Optional Toppings: ¼ cup shredded unsweetened coconut ¼ cup raw walnuts, chopped Fresh berries** Directions:
This keeps well in the fridge for about 3-5 days. I like to make a batch at the beginning of the week and scoop out a snack when I’m craving something sweet! **Adding berries will add more sugar to this meal and can increase your cravings for more sugar later in the day, so if you choose to add these, keep it to a small amount. Example: 2 strawberries, sliced or 6 blueberries. Enjoy & let me know what you think, Billie Dairy Free. Gluten Free. Soy Free. Grain Free. Vegan Version. 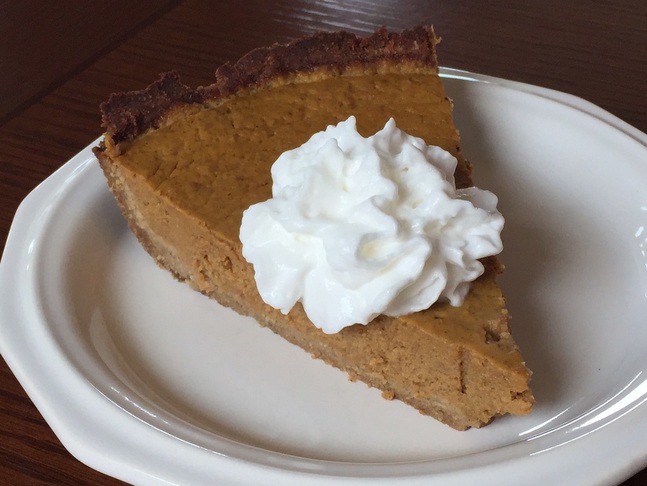 This recipe is a remake of a Thanksgiving tradition that is a must have at your celebration! Most pumpkin pie recipes rely on canned evaporated milk or heavy cream to provide the rich, creamy flavor. I don't know about you, but milk that can sit on a shelf for 365 days before going bad is a bit scary to me! I use full fat canned coconut milk here instead to give that rich, creamy flavor and consistency.
My mother in law makes an amazing traditional pumpkin pie that my husband dreams about all year long...he literally cannot celebrate Thanksgiving without this pie!! In the 5 years we've been married, we've spent several Thanksgiving day celebrations away from his family and his mother's pumpkin pie and no pie seems to be able to meet his expectations. But a few years I met the challenge...with this recipe! I hope you enjoy it as much as we do! You may also want to check out our Anti-Inflammatory Holiday eBook for 24 more holiday recipes that are all gluten, dairy, and soy free as well as low in sugar and carbohydrates. We've also included a 5-Day Thanksgiving Preparation & Meal Plan to help you rock your holiday celebration! Pumpkin Pie with Ginger Cookie Crust (PRINT RECIPE) Serves 8 Ingredients: Filling: 2 cups 100% real pumpkin puree (not pumpkin pie filling)* ½ cup full fat canned coconut milk 3 eggs, plus one egg white ¼ cup 100% pure maple syrup 1 teaspoon vanilla extract ¼ teaspoon kosher salt 1 heaping tablespoon pumpkin pie spice Crust: Homemade “Ginger-Cookie” Crust: 1/3 cup blanched almond flour ½ cup, plus 2 tablespoons coconut flour ¼ teaspoon salt ¼ teaspoon baking soda 1 ½ teaspoons ground ginger ½ teaspoon ground cinnamon ¼ cup coconut oil, melted + 2 tablespoons 2 tablespoons 100% pure maple syrup 1 tablespoon blackstrap molasses 1 egg 1 teaspoon vanilla Directions:
Trust me - this recipe is KITCHEN TESTED and HUSBAND APPROVED - just give it a try - you will be happy you did! Although you may be upset that you did not make a second one:) Enjoy & Happy Thanksgiving! ~Billie (PRINT VEGAN RECIPE) - uses silken tofu to replace the eggs and coconut milk Low Carb. Vegan. Grain Free. Super Moist & Delicious. 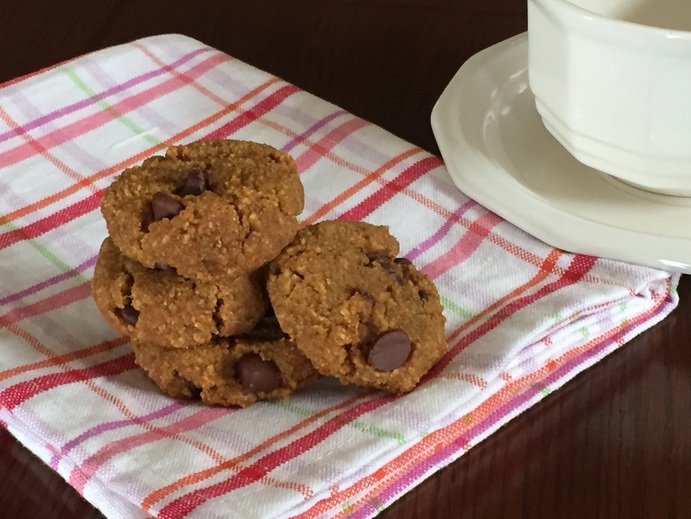 If you are a fan of chocolate chip cookies, you won't want to miss this classic recipe with a delicious seasonal twist. These cookies are the perfect way to enjoy the flavors of the Fall season. Their cake-like, soft consistency makes them super moist and they practically melt in your mouth. Want to know the best part?! These cookies are only 7.9 carbohydrates per serving and under 5 grams of sugar, making them a great low carb option to satisfy your sweet tooth.
We've used 100% pure pumpkin puree in this recipe which you can buy in a can or make yourself. When using the canned version, just make sure you use 100% pure pumpkin and not "pumpkin pie filling". You can also take a look at our blog, How to Make Your Own Real Pumpkin Puree, to learn how easy it is to make it yourself. Chewy Pumpkin Chocolate Chip Cookies (PRINT RECIPE) Makes about 20 cookies Ingredients: Scant 2 cups blanched almond flour or almond meal 1/2 teaspoon salt 1/2 teaspoon baking soda 3/4 teaspoon ground cinnamon 1/4 teaspoon ground nutmeg 1/4 teaspoon ground ginger ¼ cup coconut oil, melted and cooled ¼ cup maple syrup 2 teaspoons vanilla extract ½ cup 100% pumpkin puree (not pumpkin pie filling) 1/3 cup dark chocolate chips Directions:
Happy Fall Baking & Eating! ~Billie & Jennifer p.s. If you are allergic to nuts, check out our clean plate version that uses whole wheat flour or our gluten free version that uses a combination of gluten free and nut free flours. Chewy Pumpkin Chocolate Chip Cookies (Print Clean Plate Version) Chewy Pumpkin Chocolate Chip Cookies (Print Gluten Free Version) Grain Free. Gluten Free. Dairy Free. Vegan. Low Sugar. Low Carb. Paleo. Delicious. 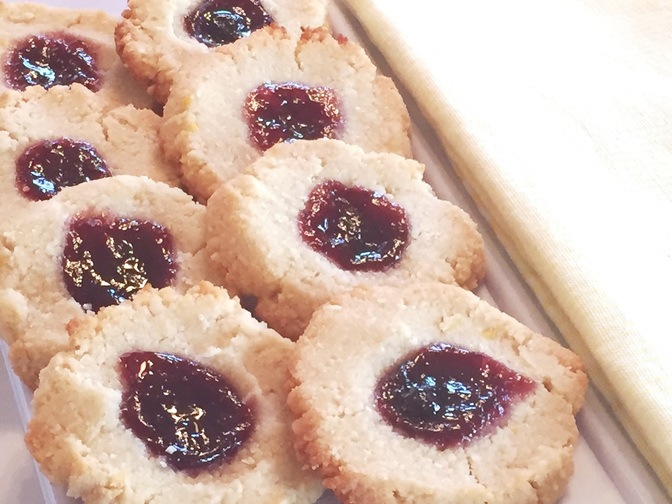 I love the combination of lemon and berries - the tart and sweet pair perfectly to give your mouth a refreshing, delicious bite. I first made these cookies a few weeks ago as I was coming off our 4 Week Spring Cleanse. I wanted to treat myself to a sweet dessert but not overindulge. I browsed the fridge and pantry and these beauties were the result:) Want to know the best part? They only have 5.5 grams of sugar and under 9 grams of carbs per cookie!
After my first bite I was in love, and so was the rest of the family apparently because they disappeared in a few days! Firm on the outside and soft in the middle with a delicious berry center, these cookies may become your new summer favorite! They would be a perfect treat to put out for a baby shower, wedding shower, graduation party or BBQ. I hope you enjoy these as much as we do! Lemon-Berry Tart Cookies (PRINT RECIPE) Makes 3 dozen cookies Ingredients: 2 1/3 cups blanched almond flour 3 tablespoons coconut flour ½ cup honey or agave ¼ teaspoon sea salt ¼ cup coconut oil, melted then cooled slightly before adding to batter Zest and juice of 2 lemons 1 tablespoon water 3-4 tablespoons organic, no sugar added berry jam of choice (raspberry, strawberry, blueberry, etc) Directions:
Yum, yum, yum! ~Billie 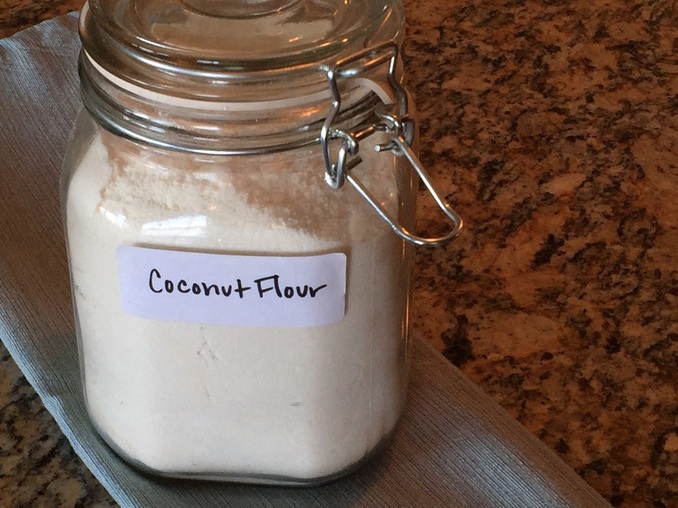 Have you ever baked with coconut flour? It's a great grain-free, gluten free, and low carb flour that can be used as a substitute for regular flour or other gluten free flours for those on a grain or gluten free diet or those looking to reduce their carbohydrate intake. It is a flour made from dried coconut meat and is a natural byproduct of making coconut milk. So in this week's What's That?! Wednesday post, we'd like to share some of the Health Benefits of Coconut Flour and 4 Tips for Baking With Coconut Flour.
Gluten & grain free diets are recommended for the increasing number of people who are being diagnosed with food sensitivities, chronic autoimmune diseases, or those with weight loss resistance or hormone imbalances. This flour happens to be one of my favorite flours to work with because it is high in fiber and virtually carbohydrate free, plus it naturally has a sweeter taste than other flours so it's a natural pairing for baked goods! The extra fiber really fills you up, so you eat less and feel more satisfied which is always the goal, especially when it comes to treating yourself to some baked goods, right?! And you know I cannot write a blog about a food item without sharing some "food as medicine" facts...so here are some of the other... Health Benefits to Consider When Choosing to Bake with Coconut Flour: 1. Coconut four is high in manganese which supports healthy nervous system function, helps maintain good bone health, supports thyroid function, and helps to maintain proper blood sugar levels. WOW - super important! 2. Coconut flour is a great source of lauric acid, a healthy, saturated fat that promotes good immune health and assists in lowering inflammatory responses in the body when combined with the right amounts of other healthy fats. 4 Tips for Baking with Coconut Flour: 1. A little bit of coconut flour goes a long way! Because coconut flour is about 60% fiber, it attracts liquids and fats and will expand significantly. This means you CANNOT substitute the same amount of coconut flour in a recipe that calls for brown rice or whole wheat flour. It will be VERY dry and crumbly and will most likely burn and you will not be happy with your coconut flour baking experience. A good general rule is about 20-25% of the amount you would use of regular flour, for example; use 1/4 cup coconut flour if the recipe calls for 1 cup brown rice or all purpose/whole wheat flour. 2. Coconut flour works best when baked with plenty of organic eggs and liquids. You will notice that most coconut four recipes use lots of eggs, for any recipe using more than 1/2 cup flour, you will generally need 4-6 eggs and at least 1 cup of liquid (like coconut milk, almond milk, hemp milk, regular whole milk, or melted coconut oil). If you are sensitive to eggs or follow a vegan diet, stick with recipes that use a small amount of coconut flour (like under 1/4 cup) and those that typically call for 2 eggs or less. You can use your standard egg replacements (chia seeds + water or ground flaxseed + water). You will also want to increase your liquid fat content in vegan recipes that use coconut flour, so I recommend coconut oil as the best choice to achieve this. 3. Add natural liquid sweeteners to your coconut flour baked goods for a long lasting moist texture. Because coconut flour really "soaks up" the fat and moisture, I love to add natural liquid or pureed fruits to my coconut flour baked good recipes. Some of my favorites include: honey, 100% pure maple syrup, organic apple sauce, 100% pure pumpkin or squash puree, or some mashed bananas. 4. Coconut flour is best in softer baked goods. Coconut flour used by itself is not great at developing a crispy texture because of the amount of moisture it can hold, so it is best used in: pancakes, waffles, muffins, cakes, and quick breads. You can also incorporate some baking powder combined with lemon juice or apple cider vinegar to help get some more of a rise in your baked goods. To make cookies or anything requiring a crispy texture, I'd suggest mixing coconut flour with other flours and only have it be 20% or so of the total flour used in the recipe. If baking with coconut flour is new to you, I would suggest starting with some already developed recipes and then as you get more comfortable, and begin to enjoy baking with coconut flour, you can experiment with converting your favorite recipes. Here are a few of my favorite coconut flour recipes to get you stared: Grain Free Banana-Cinnamon Waffles Raw Coconut Snack Balls (Under 6 grams of carbs & 3 grams of sugar per serving) Mini Honey-Lemon Muffins (Under 6 grams of carbs & 4 grams of sugar per serving) Lastly, when choosing coconut flour, always choose organic. I'm partial to Nutiva Brand & Let's Do Organic Brand, but Bob's Red Mill or other organic varietals are great as well...go for what's on sale! I often order products like these online to save some money and time. Check out the list of coconut flour products, including the ones I mentioned above, available on Amazon by clicking here. I also recently started to use Thrive Market for some products as well and have been very happy with their service...check that out by clicking here. Please share your comments, questions, and favorite recipes with us below. Happy Baking! ~Billie Grain Free, Dairy Free, Soy Free & Low Carb 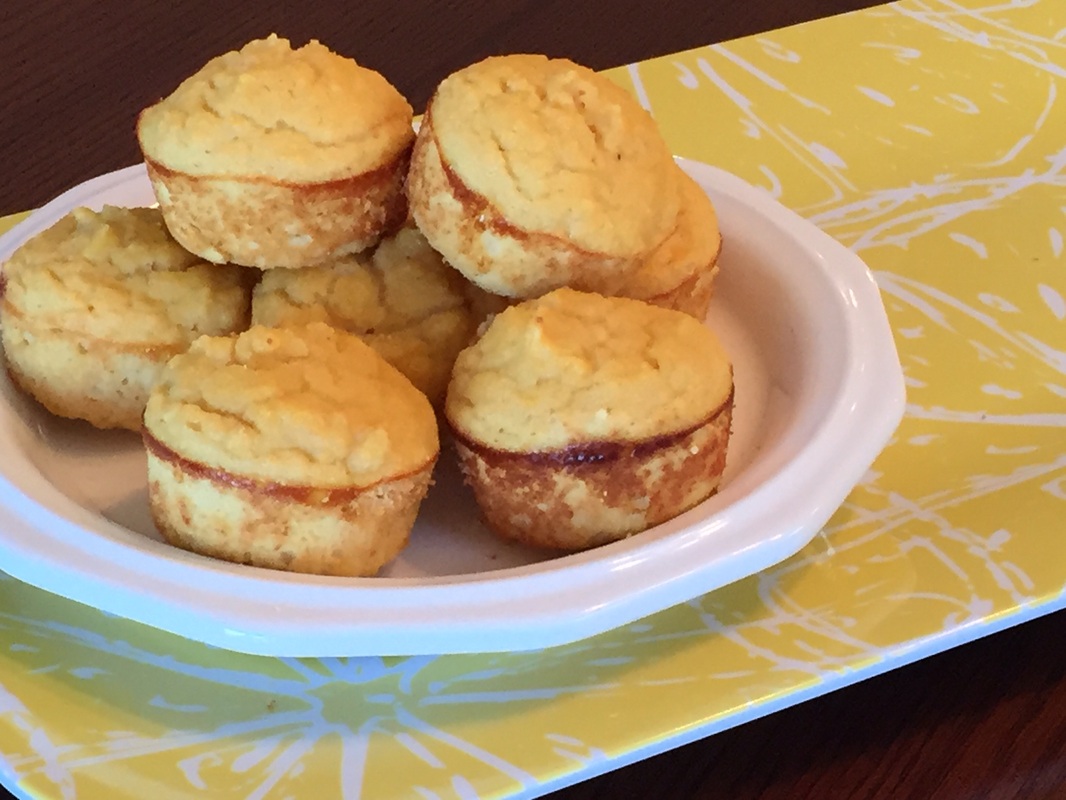 Hey friends...I'm back to share a new recipe with you...one that I know you are really gonna love! It's been about 2 months since I've been able to spend time in my kitchen experimenting with some new recipes and my soul has been craving it big time!
This weekend I finally made it back into the kitchen for some of my favorite, "creative cooking and baking time"....aah...cooking, baking and eating whole foods really feeds my soul as much as my body. Now it's time to share a new recipe that will hopefully fuel your soul and body as well. I instantly fell in love with these muffins after the first batch- a great, fresh treat for Spring. These would be a perfect addition to your Easter Sunday or Mother's Day Brunch spread. These little muffins use coconut flour as their base, you can learn more on our blog post: 4 Tips for Baking with Coconut Flour . They are light weight, grain-free, and low in carbs & sugar...a perfect treat in the perfect size for anyone following a paleo style or low carb diet. In fact they are under 6 grams of carbs and 4 grams of sugar per serving and super easy to make. Check it out... Mini Honey-Lemon Muffins (PRINT RECIPE) Makes 20 mini muffins or 12 regular size muffins Ingredients: 6 organic, pastured eggs ½ cup unsweetened coconut milk (You can substitute your favorite milk instead if you prefer.) ¼ cup + 1 heaping tablespoon honey or agave 1 ½ teaspoons vanilla extract ¼ cup coconut oil, melted & divided Juice and zest of one lemon Heaping ½ cup coconut flour ¾ teaspoon baking power ½ teaspoon salt Directions:
The lemony flavor gets stronger after they cool and ever more so the next day. These will stay moist in an airtight container for up to 4 days on your counter top if they last that long. If you'd like a richer taste, trying spreading on a little organic, grass-fed butter or ghee and drizzle some extra honey. Let me know what you think. Happy Baking! ~Billie Grain Free. Vegan. Paleo. Low Carb. Low Sugar. Super Good. 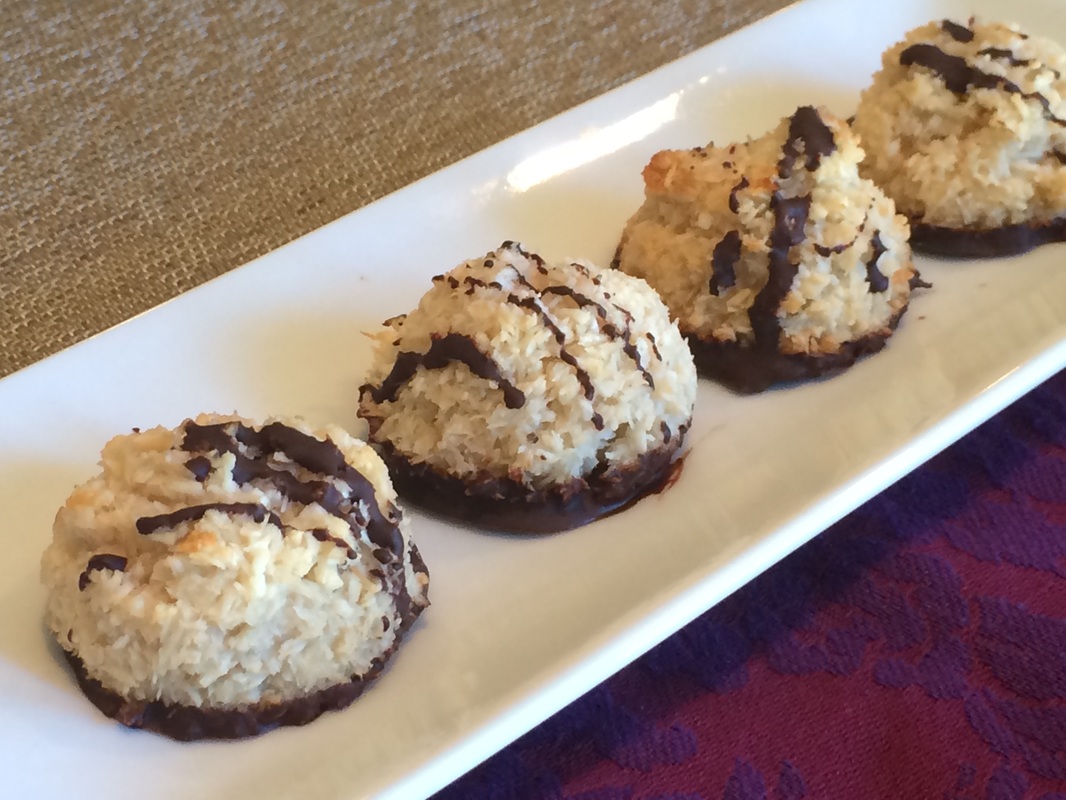 Macaroons may seem like they would be tough to make, but it only takes six simple ingredients and little bit of time to make these delectable and beautiful treats. Each bite is slightly crunchy on the outside and soft and moist on the inside. YUM...writing this blog is making me want to eat another one.
Instead of using sweetened condensed milk like most macaroon recipes do, we substituted a can of full fat coconut milk and some honey that we boiled down to make a thicker, sweeter milk. It is similar enough to sweetened, condensed milk but with healthier fat and a cleaner sugar choice...and it really pulls these treats together nicely! If you are on a low or little to no sugar diet like I am, these beauties fit the bill. They are under 5 grams of sugar and 8 grams of total carbs per serving, making them a great low carb dessert for your holiday, special occasion or for when a sweet tooth strikes. A must try for anyone wanting a simple, elegant dessert that is light on sugar and carbs. If you like this dessert and want more recipes like these, check out my Anti-Inflammatory Diet Holiday Cookbook, with 24 more additional recipes that are low sugar, paleo, mostly grain free, dairy free, gluten free, and soy free. Dark Chocolate Drizzled Coconut Macaroons (PRINT RECIPE) Makes about 18 macaroons Ingredients: 1 (14-ounce) can full fat coconut milk ¼ cup raw honey or agave 2 cups unsweetened shredded coconut ½ teaspoon vanilla extract Pinch of salt 1 (3-ounce) dark chocolate bar Directions:
Enjoy friends! ~Billie & Jennifer Grain Free. Gluten Free. Vegan. Paleo. Awesome. 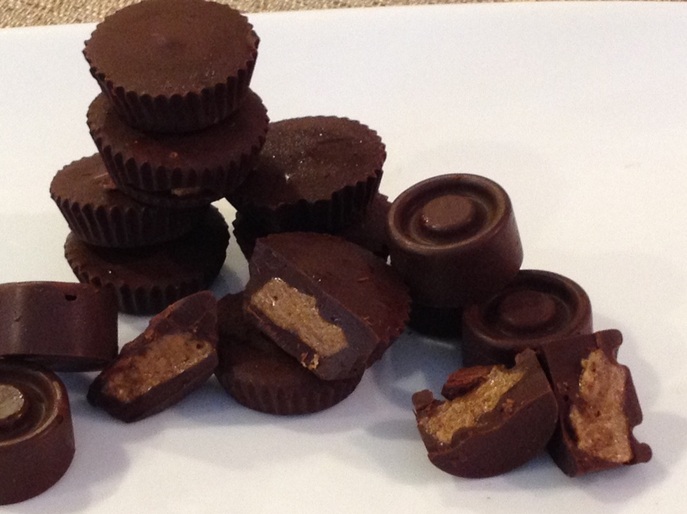 Halloween marks the beginning of that time of the year where there always seems to be endless amounts of candy everywhere you go. It's like you cannot get away, right?! It's at work, the kids bring it home from school, it's at social events, and staring you in the face at every check out stand - its plain difficult to avoid. One of my favorite candies growing up was Reese's Peanut Butter Cups. Reese's is a product I refuse to put in my body these days, so instead, when I want to treat myself to a piece of candy I choose Justin's Dark Chocolate Almond Butter Cups and sometimes Trader Joe's Dark Chocolate Peanut Butter Cups - both are amazing and made from much higher quality ingredients than Hershey's Brand.
So I started to think I could just make these myself, get the calories and the sugar down and control my ingredients...and so I did...and found that it is very simple and this recipe and blog are the result. These are 11.7 grams of sugar per serving compared to Justin's and Reese's which are 17 grams and 21 grams respectively. Check it out... Dark Chocolate Almond Butter Cups (PRINT RECIPE) Makes 15-16 mini cups or 8-9 larger cups Ingredients: ¾ cup dark chocolate chips or chopped dark chocolate (60% or higher - I like using 70%) 1 tablespoon coconut oil ¼ cup smooth, all natural, raw almond butter Pinch of sea salt ½ tablespoon maple syrup Kitchen Utensils Needed:** Mini silicone candy molds or silicone mini muffin tray OR regular mini muffin tray with small baking cups to fit inside Directions:
I hope you enjoy this recipe as much as I do. Comment, like and share as it pleases you! Happy Halloween! ~Billie Gluten Free. Dairy Free. Vegan Version. Anti-Inflammatory Version. 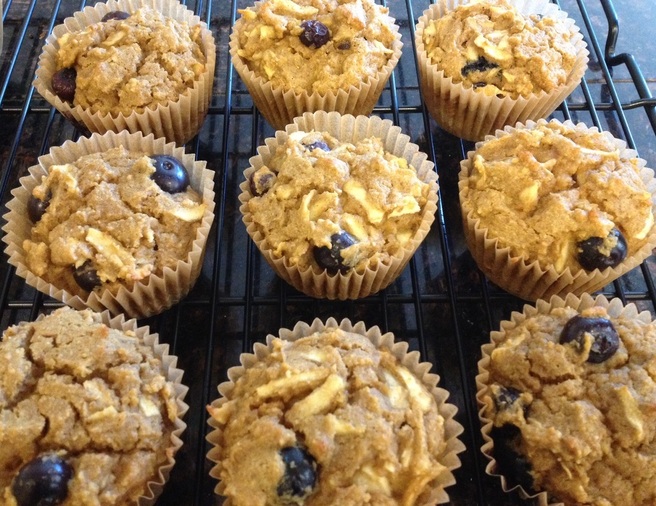 As these first signs of Fall hit us, my soul wants to be spending more time in the kitchen baking and cooking savory meals. Somehow Fall puts me in this mood every year and these muffins are a perfect way to celebrate the transition of seasons. They combine the fresh blueberries of summer with sweet fall apples and a hint of squash and cinnamon to make them mouthwatering delicious! I developed this recipe last year after being inspired by a recipe one of my friend's sent me and it has become our favorite muffin recipe. I use quinoa and almond flours here as they are heartier and more nutritious flours than whole wheat or all purpose. These muffins are super light, moist, and full of flavor, plus the Anti-Inflammatory version has only 4.1 grams of sugar per muffin and only 15 net carbohydrates!
Butternut Squash, Apple, & Blueberry Muffins (PRINT RECIPE) (PRINT VEGAN VERSION) (PRINT ANTI-INFLAMMATORY VERSION) Makes 12 Muffins Ingredients: ½ cup 100% pure squash or pumpkin puree 1 ½ cups quinoa flour** ½ cup almond flour ½ teaspoon baking powder ½ teaspoon baking soda ½ teaspoon salt ½ teaspoon ground cinnamon ½ teaspoon ground ginger 3 large eggs 2 tablespoons coconut palm sugar 2 tablespoons maple syrup or agave 1/3 cup coconut oil, melted 1 teaspoon pure vanilla extract 1 teaspoon grated lemon zest 1 cup blueberries fresh or frozen and thawed 1 sweet apple (Gala, Pink Lady, Honey Crisp), peeled, cored, and grated or chopped into fine pieces 2 tablespoons chopped nuts (walnuts, almonds, or hazelnuts work well) (optional) Directions:
**If you don't have quinoa flour, you can use a blend of 3/4 cup brown rice flour and 1/2 cup sweet sorghum flour instead. This combination works very well. I hope you are each enjoying the start of Fall as much as I am. Let me know what you think... ~Billie Vegan. Gluten Free. Low Carb. Super Tasty. 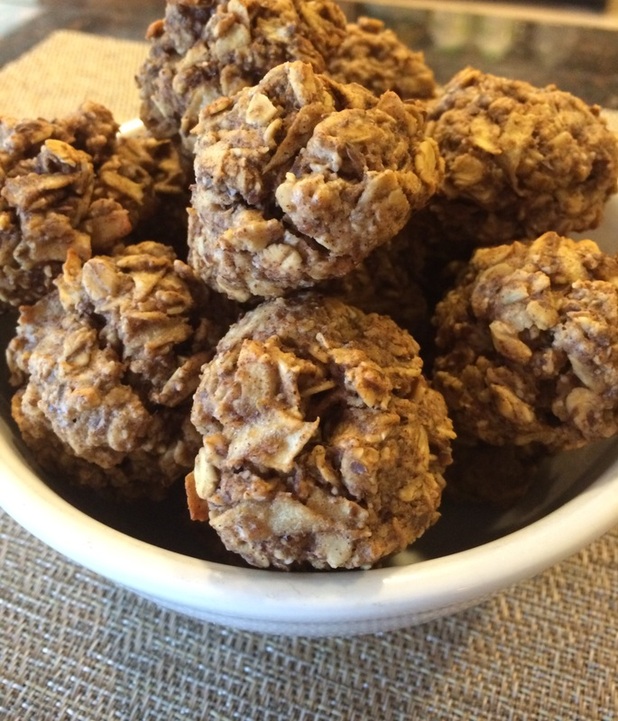 This simple, healthy treat is sure to become a fall family favorite! These are super kid friendly and a great way to pack a healthy dessert in your kid's lunchboxes. My husband says these taste like doughnut holes - YES! I love it when a healthy food gives you the feeling that you are really indulging on something sinful, don't you? Enough said...now go make the most of apple season and try some of these delicious snacks as soon as possible...you will not be disappointed!
Apple Oatmeal Snack Balls (PRINT RECIPE) Makes about 15 snack balls Ingredients: 1 cup whole rolled oats or gluten free rolled oats (also known as Old Fashioned oats) 1/2 cup (packed) coarsely grated peeled apple (I love pink lady and honey crisps, gala or fuji) 1/3 cup creamy unsweetened almond butter** 1/4 cup unsweetened applesauce 2 tablespoons ground flaxseed 2 tablespoons 100% pure maple syrup 1 teaspoon ground cinnamon 1/4 teaspoon baking soda 1/4 teaspoon salt 1/4 cup raisins or craisins (optional) Directions:
**unsweetened sunflower butter works great as a nut free substitute. You can also use peanut butter here but may need to add another tablespoon of flaxseed since peanut butter is a little runnier in consistency than almond butter. Please post back and let us know what you think after you try the recipe! Happy eating! ~Billie & Jen 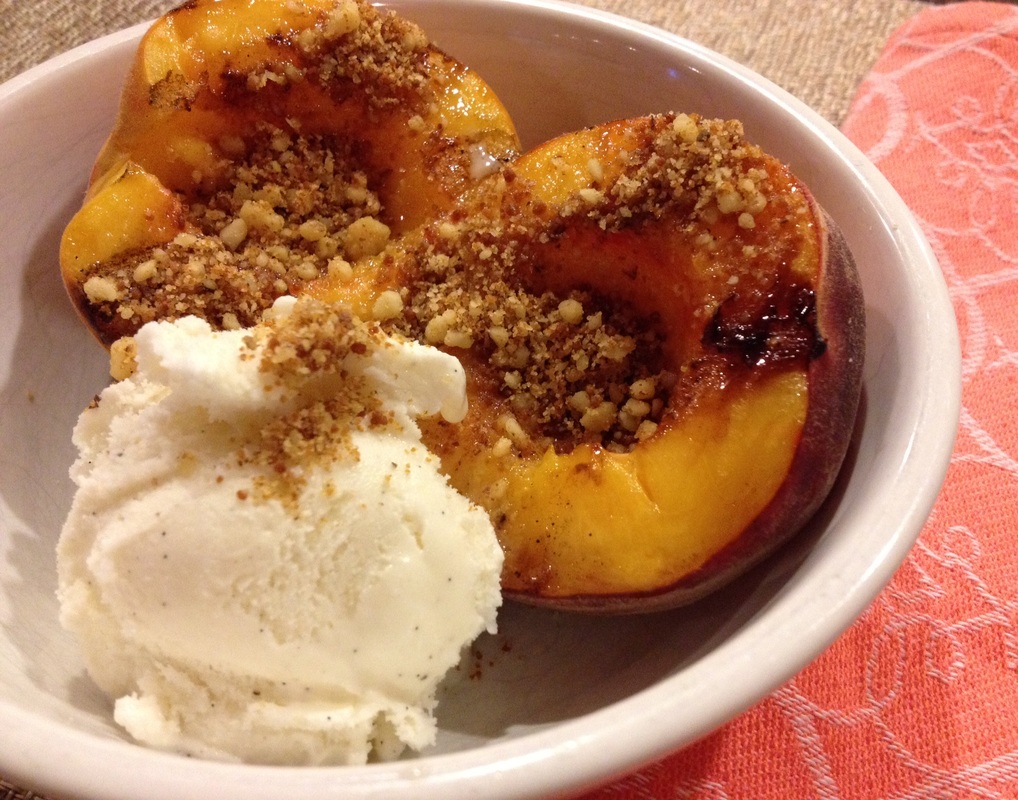 We couldn't let the summer slip away without delivering on a delicious fresh peach recipe. And while peaches are a treat just on their own, they somehow morf into a decadent dessert when you heat them up a bit. If you've never tried grilled peaches, you are in for a treat - just make sure your grill is good and clean!
This recipe allows for the sweetness of the peaches stand out as the dominant flavor and adds ginger as the perfect compliment. The ground walnuts and coconut sugar make for a perfect topping to make you feel as if you are eating a cobbler or pie (but without the added sugar). Check it out before those fresh peaches are gone, gone, gone... Grilled Peaches with Walnut-Ginger Crumble (PRINT RECIPE): Serves 4-8 Ingredients: 1/3 cup raw walnuts or walnut halves 4 tablespoons coconut sugar, divided ½ teaspoon ground ginger ¼ teaspoon cinnamon 1 tablespoon coconut oil, melted 4 medium organic peaches, halved and pitted Directions:
Hope you all enjoy the upcoming Labor Day Weekend and the last few weeks of summer! ~Billie & Jen Vegan. Gluten Free. Raw. Delicious. 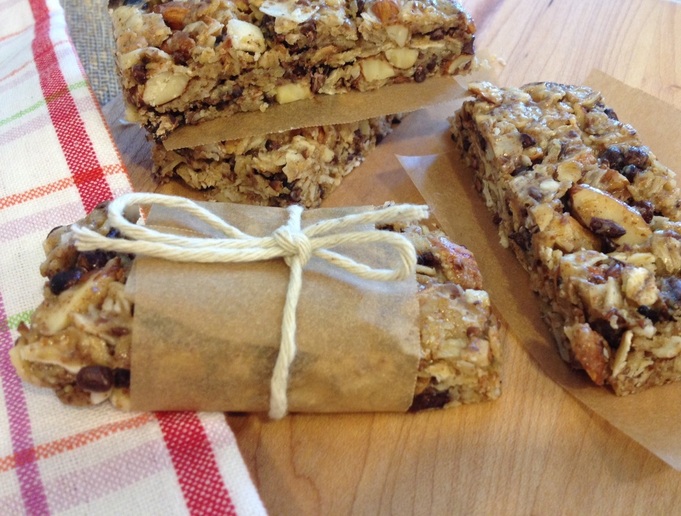 The granola bar has always been one of my quintessential comfort foods! It reminds me of my childhood and my grandparents specifically - my brother and I spent lots of time hiking and biking in the summers with them. We would always pack our day packs with a granola bar so that we'd have a great snack to enjoy when we reached the summit of whatever mountain we were climbing that day. It always hit the spot and still does today because it satisfies that sweet tooth while providing ingredients that are nutrient dense and give you energy.
This recipe is an easy and healthy way to satisfy your granola bar craving, you don't have to turn on your oven and the best part about this recipe is that's it completely customizable to whatever your likes and dislikes are. Don't like coconut? Use gogi berries, raisins, or craisins instead. No almonds on hand? Grab some sunflower or pumpkin seeds or a combination of the two. Check it out... No Bake Granola Bars (PRINT RECIPE) Makes 12-14 bars Ingredients: 1 cup whole rolled oats/gluten free whole rolled oats ¼ cup ground flaxseed 1 cup sliced almonds (substitute sunflower or pumpkin seeds or a combination) ½ cup toasted coconut flakes (substitute another dried fruit like go-gi berries, raisins, or craisins) ½ cup cacao nibs or dark chocolate chips 2/3 cup raw almond butter or natural peanut butter 6 tablespoons honey or agave 1 teaspoon vanilla extract Directions:
While these bars won't stand up well in the heat, they do stay very fresh for up to 10 days if they are wrapped in parchment paper and kept in an airtight container in the fridge. And they will do well at room temperature for up to a few hours. Happy Eating! ~Billie 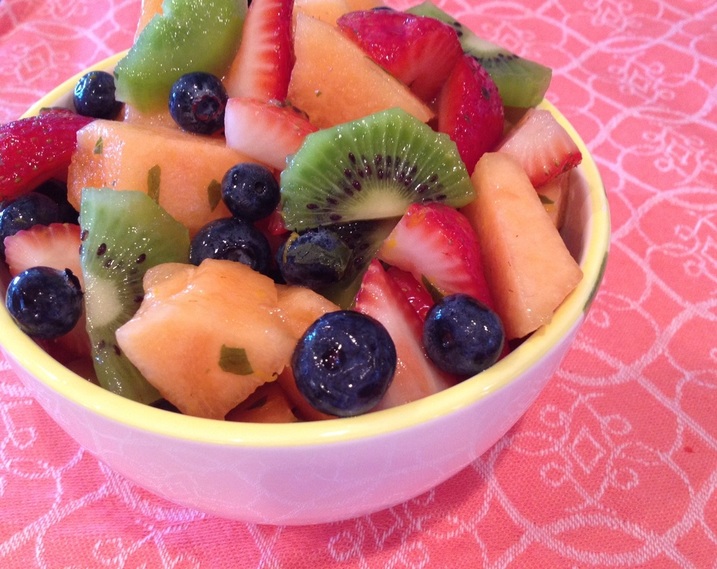 This lovely and lightweight fruit salad takes advantage of all the colors and flavors of summer. Just grab your favorite melon(s), fruits and berries and toss them in this simple citrus-mint dressing for a light dessert, snack, or side dish for breakfast or brunch.
Colorful Fruit Salad with Citrus-Mint Dressing (PRINT RECIPE) Serves 4 Ingredients: 1 medium organic cantaloupe, cut into 1-inch cubes 3 kiwi fruit, peeled and sliced into half moon shapes 1 pint organic strawberries, stems removed and quartered 6 ounces organic blueberries 1 tablespoon honey or agave 2 tablespoons fresh mint, minced 2 tablespoons orange juice 1 teaspoon orange zest 1 teaspoon fresh lime juice Directions:
If you are making this ahead of time, reserve the dressing and then toss it on to coat 1 hour prior to serving. Pretty simple, lots of flavors, nice and light...you really cannot go wrong with this salad! Enjoy! ~Jennifer & Billie |

Billie Shellist, FDN-P
I practice functional nutrition, an approach that allows me to look at your entire health history and help you find the "root causes" of your chronic health complaints. This cuts out the trial and error process and helps you get real symptom relief and resolution! Food is medicine and knowledge is power -I hope you enjoy my anti-inflammatory recipes which are gluten, dairy, and soy free as well as very low grain and sugar. If you'd like to heal from the root cause(s) of your chronic symptoms, try starting with a complimentary 15-minute consultation. Click here to request your free session. |
|
Copyright 2024 Functional Diagnostic Healing. All rights reserved. Professional photography by Priscilla Durkin- www.priscilladurkin.com Privacy Policy - Legal Notice |