
|
Paleo. AIP. Gluten Free. Dairy Free. Soy Free. Grain Free. Delicous! 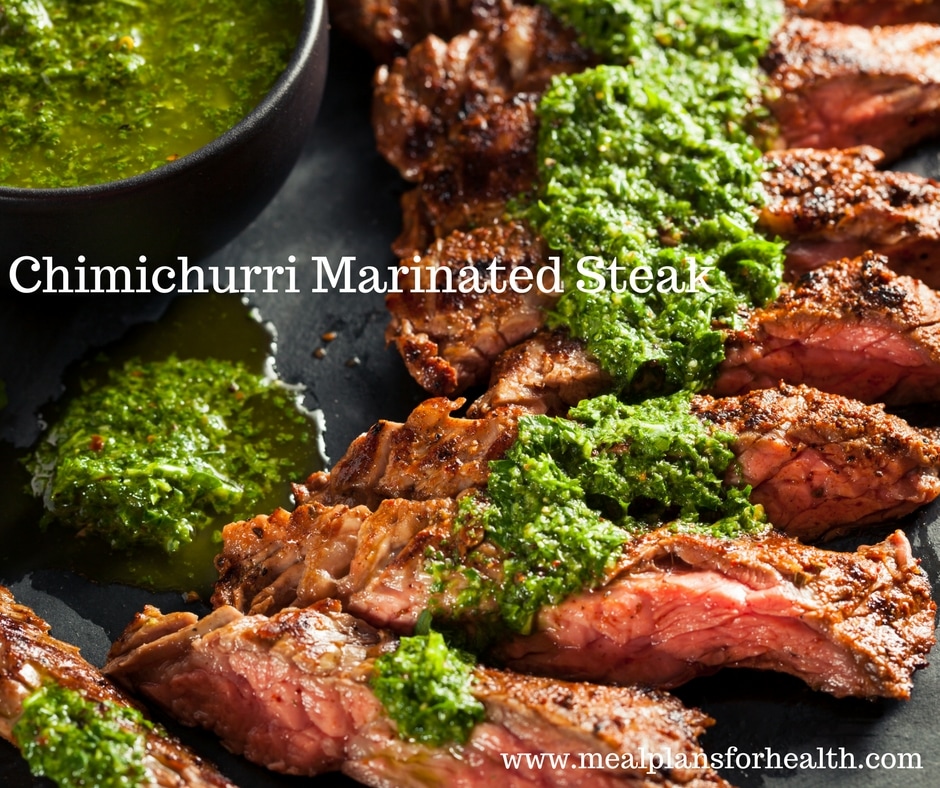 If you are looking for a super easy dish that is packed with flavor this holiday weekend...look no further. This chimichurri marinated steak recipe will blow you away and is just one of the delicious dishes in our Spring Anti-Inflammatory Eating Plan eBook.
Spring and summer are bursting with fresh, anti-inflammatory herbs and this dish is the perfect vessel for them to shine! This recipe works for any cut of steak, so feel free to substitute your favorite. I like to double or triple the chimichurri sauce recipe and freeze it in 1 cup increments for easy defrosting later down the line. Just defrost in the fridge overnight. This chimichurri can be used with any other cut of meat of fish and tastes divine on grilled, steamed, or roasted vegetables so experiment and have some fun with it! Chimichurri Marinated Steak (PRINT RECIPE) Serves 4 Ingredients: 1 ½ lbs grass-fed steak (skirt, flat iron, flank) 1 teaspoon salt 1 teaspoon pepper Chimichurri: ¼ cup chopped fresh oregano leaves ¼ cup chopped fresh cilantro 2 tablespoons chopped fresh parsley 1 tablespoon fresh thyme ¼ cup finely minced shallots 5 cloves garlic, chopped ½ teaspoon red pepper flakes ¼ cup red wine vinegar 1 cup olive oil Directions:
I like to pair this dish with some roasted potatoes or celery root fries (recipe included in our Spring Anti-Inflammatory eBook) and some steamed or grilled asparagus. But you can also go more traditional and serve this with rice, beans and a veggie of choice. Either way this dish is a winner! Enjoy & Happy Memorial Day Everyone! ~Billie
0 Comments
Gluten free. Grain Free. Dairy Free. Egg Free. Soy Free. AIP. Paleo. 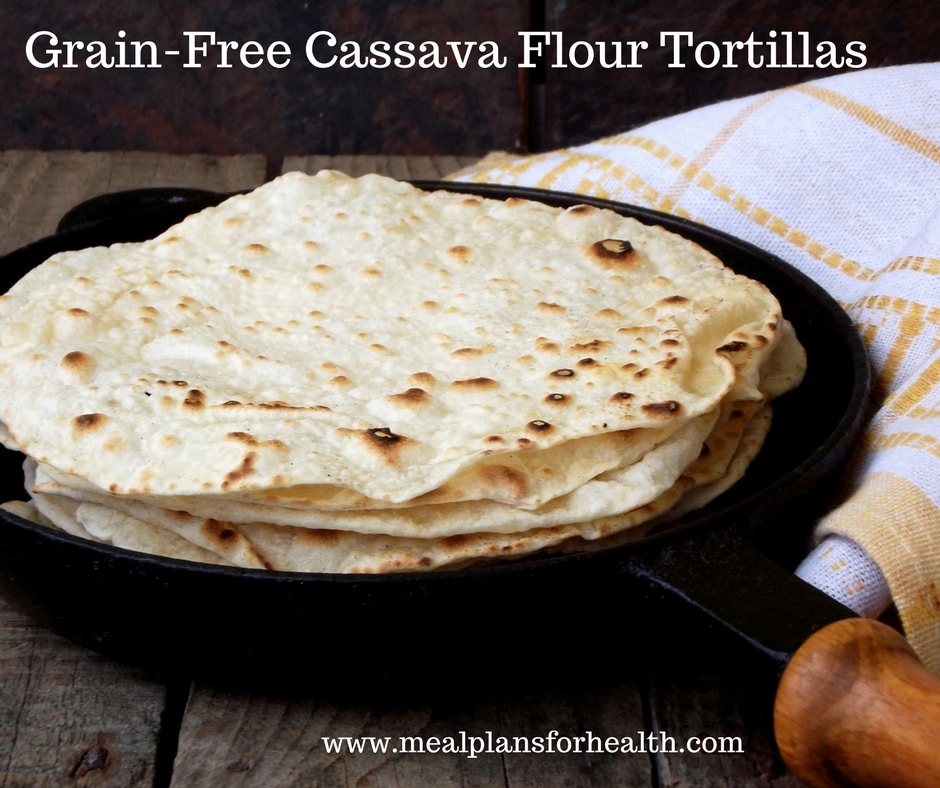 These tortillas really have a nice flavor and texture and are fairly easy to master. You can use them in tacos, wraps, or cut into wedges and make pita chips. The secret is to keep your ghee (or grass-fed butter cold).
Try these with our Fish Tacos with Mango Salsa or our Crockpot Brisket Tacos or even our Chicken & Walnut Wraps. These are super versatile and you will be surprised just how much these satisfy a craving for regular tortillas. These are AIP and paleo approved but most of all family approved from my kitchen to yours! Grain-Free Cassava Flour Tortillas: (PRINT RECIPE) Serves 4 (Makes 8 smaller taco size tortillas or 4 larger ones) Ingredients: ¾ cup cassava flour ¼ cup arrowroot flour/powder ¼ teaspoon salt ¼ teaspoon baking soda 3 heaping tablespoons ghee, cold + 2 tablespoons (alternatively you could use grass-fed butter) ¼ - ½ cup slightly warm filtered water Directions:
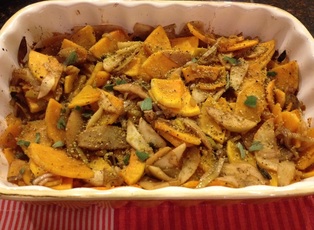
I hope you enjoy these as much as we do! Happy Cooking! ~Billie 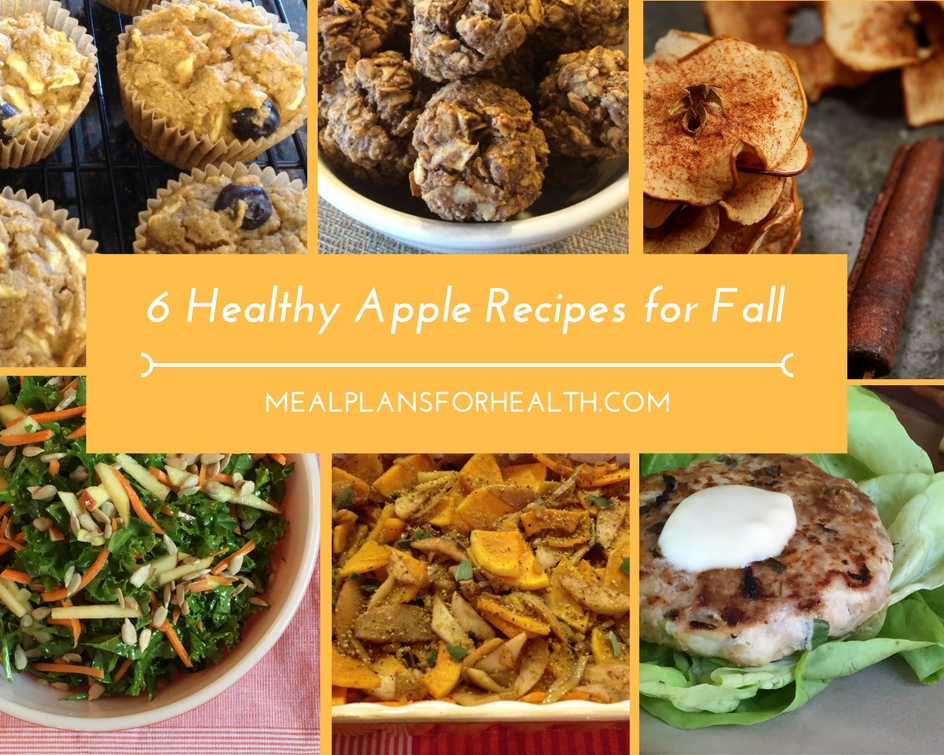 Fall is here and it's my favorite season of the year by far! The warm sun, mixed with the cool air and a colorful, fall landscape to look over - you just can't beat it. But fall certainly wouldn't be complete without APPLES for me!
After living in a home with an enormous apple tree for several years that gave us boat loads of apples every fall, I had to get really creative with how many ways I could use up my harvest. These six recipes are just some of my favorites and I wanted to share them with you today. Each of these are low in sugar and carbs, gluten, dairy, and soy free, super simple to make, and amazingly tasty for your belly! I hope you and your family enjoy them as much as my family and I do. Gluten free. Dairy free. Soy free. Nut free. Low sugar. 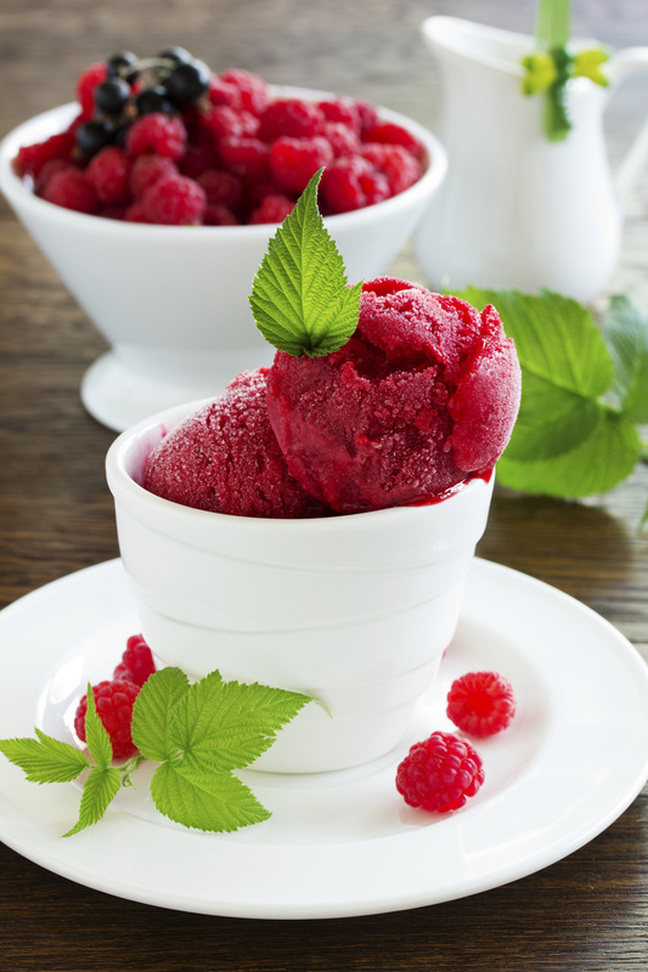 This is a perfect treat on a hot summer day! We use antioxidant loaded berries and touch of honey to make this super simple sorbet we know you will love! This is a great way to satisfy your sweet tooth or an ice cream craving without all the extra sugar and calories. I love using berries not only because they are packed with antioxidants but also because they are one of the few low glycemic fruits.
You do not need an ice cream machine for this recipe, all you need is a blender and 5 minutes of time, check it out... Simple Berry Sorbet (PRINT RECIPE): Makes 6 servings Ingredients: 2 cups frozen strawberries 1 cup frozen blueberries 2-4 tablespoons honey or agave 1 teaspoon lemon juice Pinch of salt Directions:
Feel free to get creative here and use your favorite fruit and fruit combinations. Some other flavor combinations I really like are: Mango-Mint, Peach, and Pineapple-Banana. Let me know what you think of this recipe and please share your creative versions! ~Billie Gluten, Dairy, Soy Free, Low Sugar, Anti-Inflammatory 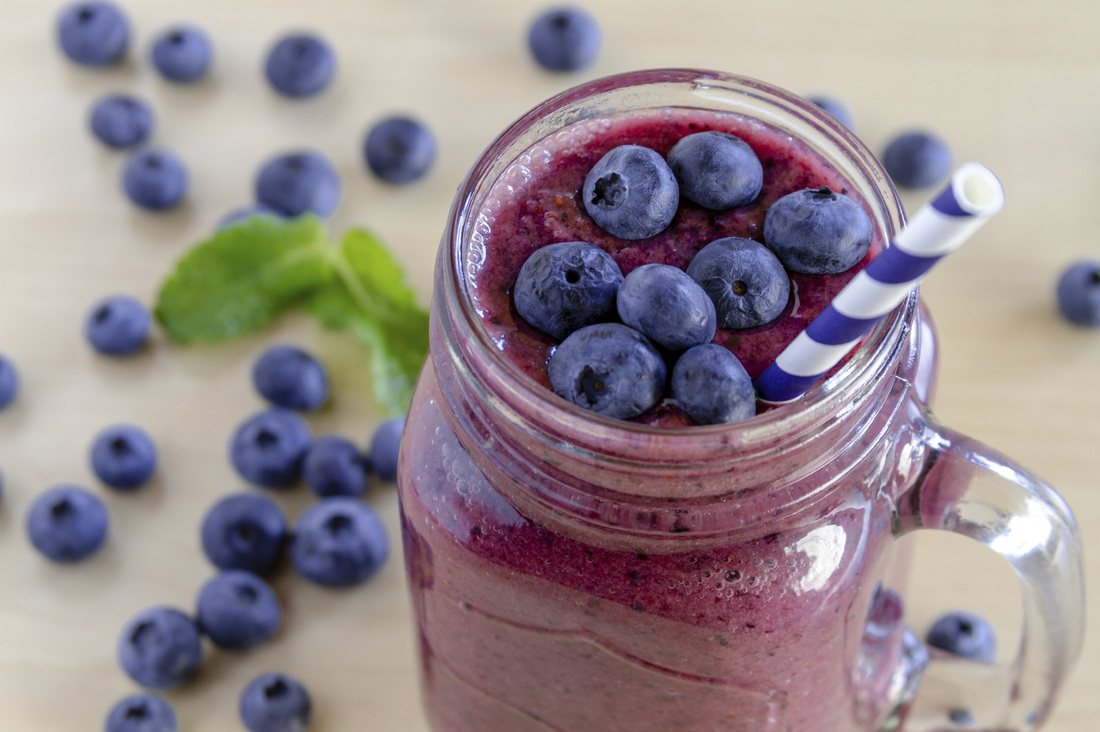 We call this smoothie the "sneaky green smoothie" because the berry flavor is delicious and dominant, making it very easy to hide some healthy leafy green vegetables:) This is a perfect way to get some greens into picky eaters like kids and maybe even your spouse!
In fact starting your day with a green smoothie can help to boost your metabolism and energy for the day, improve digestion, and reduce cravings for sugar and carbs later in the day. Plus berries are loaded with antioxidants that help neutralize free radicals that can lead to disease and early aging in your body - especially blueberries which are one of the top anti-inflammatory foods on this planet! To learn more, check out our blog, Top 8 Anti-Inflammatory Foods. Sneaky Green Berry Smoothie: (PRINT RECIPE) Serves 2 Ingredients: 1 cup organic spinach 1 -1 ½ cups lighter greens like romaine or cucumber ½ cup frozen organic berries of choice ½ of a ripe avocado, peeled & de-seeded 2 cups unsweetened non-dairy milk of choice (like almond, coconut, or hemp) 2 servings protein powder (2 scoops) 2 tablespoons ground organic flaxseed or chia seeds Directions:
Enjoy friends! ~Billie Gluten, Dairy, & Soy Free 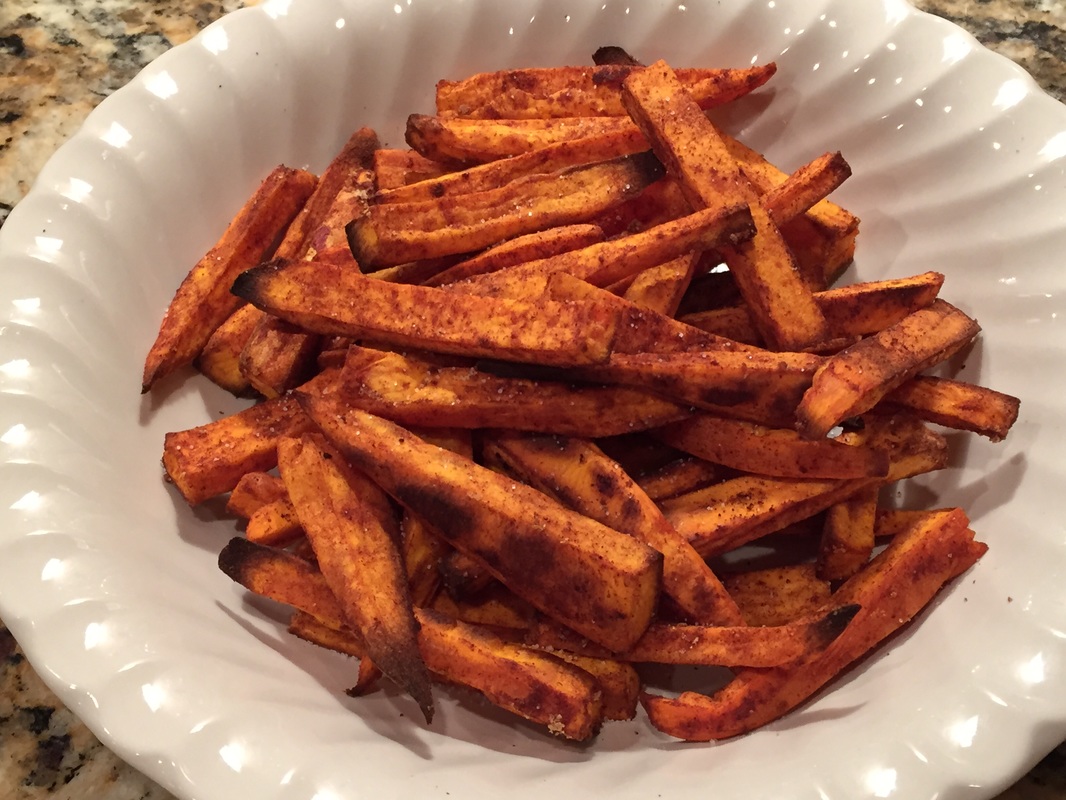 Sweet potatoes are a great source of antioxidants, beta-carotene, and Vitamins A & C to support a healthy immune system. Because they are more fibrous than white potatoes, they have a lower glycemic response and fall into the “good carb” category! Cinnamon can also help to reduce sweet cravings –an awesome bonus! Plus these sort of taste like you are having a dessert:) This is just one of over 30, clean food dishes in our 10 Day Sugar Detox eBook, a 10 day clean eating guide to help you ditch processed foods, beat cravings, and boost your nutrition!
Salty, Cinnamon Sweet Potato Fries: (PRINT RECIPE) Serves 4 Ingredients: 2 medium sweet potatoes, sliced into fries* 1 ½ tablespoons coconut oil, melted 1 teaspoon ground cinnamon 1 teaspoon sea salt Directions:
*You can peel your potatoes, but we leave the peel on for the extra vitamins. You can also chop these into small cubes if you prefer instead of fries- either way they are delicious! Enjoy friends! ~Billie Dairy Free. Gluten Free. Soy Free. Low Carb. Low Sugar. 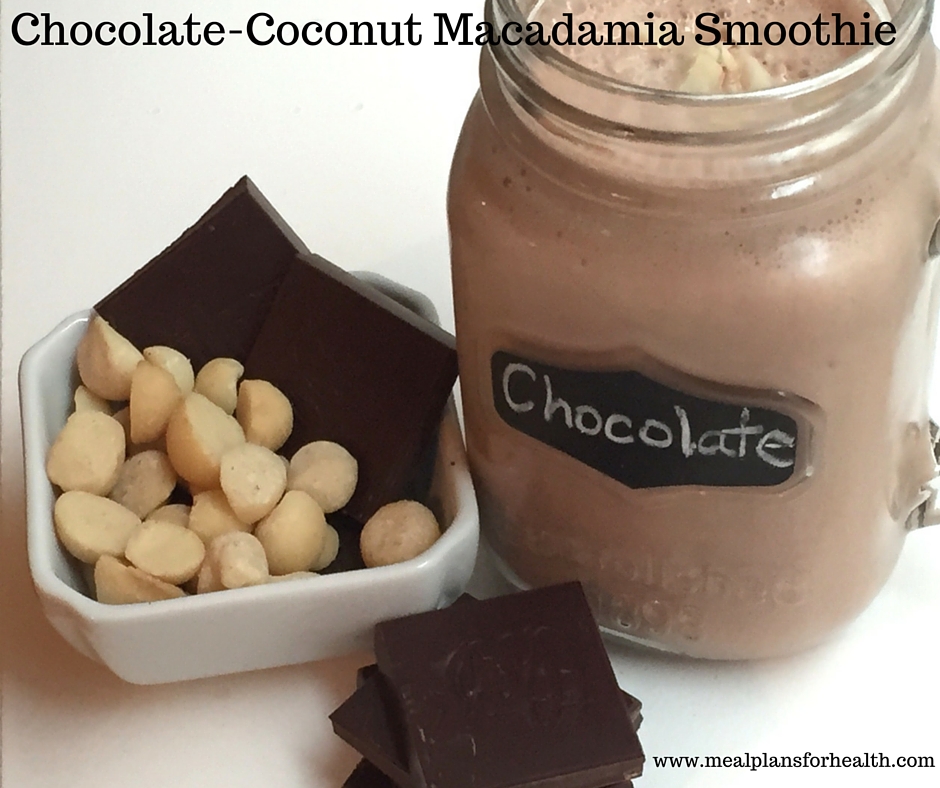 I'm enjoying one of these as I write this blog today! This is a very filling smoothie that I like to use when a sweet or specifically chocolate craving hits. It tastes like dessert but I'm getting lots of healthy fats, protein, and fiber to keep me feeling full and satisfied. Plus, it only has 4.1 grams of sugar and is under 10 grams of carbs per serving. If you can't do chocolate, leave it out and just do Coconut-Macadamia Smoothie:)
Macadamia nuts are a great source of monounsaturated fat, the same type of fat found olive oil and avocados. Monounsaturated fats are hailed as one of the best types of fat to prevent heart disease and several studies show that these healthy fats can also help improve insulin resistance and reduce the risk of diabetes. Stay tuned tomorrow when we share all about the health benefits of monounsaturated fats on our "What's That?! Wednesday post" plus give you a couple new recipes to help you incorporate these into your diet with ease and deliciousness. Chocolate-Coconut Macadamia Smoothie (PRINT RECIPE) Serves 2 Ingredients: 2 scoops unflavored, vanilla, or chocolate flavored protein powder of choice* Heaping 1/3 cup raw, unsalted macadamia nuts 1 heaping tablespoon raw, organic cocoa powder or raw cacao nibs 1 teaspoon ground organic cinnamon 2 tablespoons raw coconut butter or raw coconut manna (different from coconut oil) OR 1/2 cup of raw, frozen coconut chunks or shavings 1-2 tablespoons chia seeds (optional) for extra fiber boost 2 cups unsweetened non-dairy milk of choice (Coconut, Hemp, or Almond) 1-2 cups ice cubes depending on how thick & cold you like it Directions:
*Check out our blog, How to Choose a Protein Powder. And if you like recipes like these, check out our 10 Day Sugar Detox eBook - a 10 day clean eating guide to help you incorporate healthy foods and reduce your sugar and simple carb intake. Enjoy friends! ~Billie Anti-Inflammatory. Gluten-Free. Dairy-Free. Grain-Free. Soy Free. Low Carb. Nightshade Free Optional. 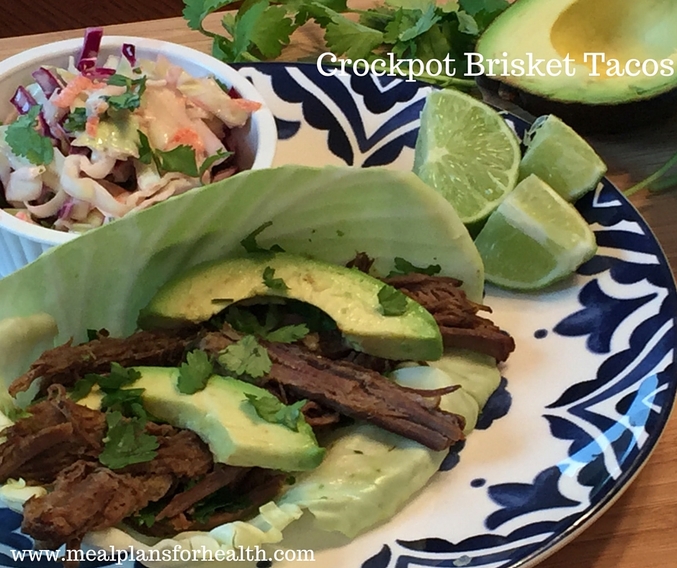 This is a great meal to feed a large group or perfect for a "cook once, eat twice" (or 3-4 times) family meal:) I make this for my family of four and it gives us each 3-4 meals that week which saves me time and energy! The leftover meat makes for a great lunch to go in a wrap or on a salad. Or reheat the meat and serve with sauteed greens and some roasted squash or sweet potatoes for a completely different dinner later in the week.
This recipe is very simple with only 15 minutes of hands-on time and then you don't have to touch it for 6-8 hours. The flavors of this spice rubbed, slow cooked meat create an amazing, mouth watering bite everyone at your table will love! It is not "over-seasoned" or crazy spicy so its good for those who don't LOVE spice. You can always add more spice if you like more and or you can omit the nightshade items (marked as*) completely if you want less or none at all. Just be sure to use organic, grass-fed beef and this will be a meal of healthy saturated fats and clean proteins. Non-organic, grain-fed beef is fed with GMO-based, grain-feed that is highly inflammatory and should be avoided. Plus conventional meats are loaded with antibiotics that kill your good gut flora and hormones that can throw off your metabolism. Stick with grass-fed and you will be good to go! If brisket is a bit too pricey or you can't find it, a grass-fed beef roast or beef shoulder would also work just as well and cost a little less. Crockpot Grass-Fed Beef Brisket Tacos (PRINT RECIPE) Serves 8-12 Ingredients: 3-5 pounds of grass-fed beef brisket 1 large yellow onion, coarsely chopped 6-8 cloves of garlic, sliced in half lengthwise 1-2 jalapenos, de-seeded and roughly chopped* (optional – leave it out if you don’t like spice or can’t do nightshades) 1 cup cilantro, chopped ½ cup organic beef broth 1 small head green cabbage or lettuce for “taco shells” 2 avocados, deseeded, peeled, and sliced ½ cup fresh cilantro, chopped for garnish 4-6 limes, quartered Salsa (optional)* Spice Rub: 4 teaspoons sea salt 1 teaspoon ground pepper* 1 teaspoon ground turmeric 1 teaspoon cumin 1 teaspoon coriander 1 teaspoon onion powder 1 tablespoon chili powder* Directions:
*Leave these items out if you are sensitive to nightshades or don’t like spicy foods. This dish will still come out amazing, I promise! **I like to double this spice rub, so I’ve already got some on hand for next time. You can store it in a small jelly jar/glass container for up to 3 months. ~Happy Eating! Billie Anti-Inflammatory, Grain-free, Gluten-free, Dairy-free, Soy-free, Low-carb 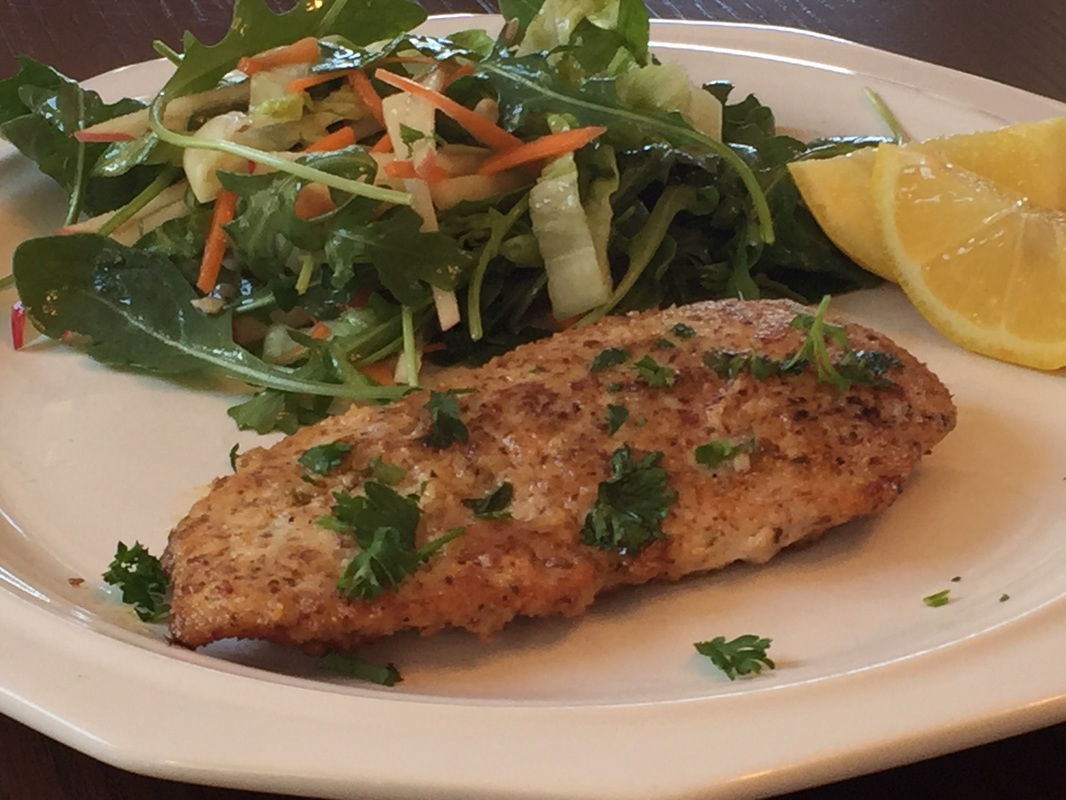 Herb Crusted Chicken Breast (PRINT RECIPE):
Serves 4 Ingredients: 4 (6-ounce) organic skinless, boneless chicken breasts ½ teaspoon sea salt ½ teaspoon ground black pepper ½ teaspoon garlic granules/garlic powder ½ teaspoon dried oregano ½ teaspoon sweet paprika 2 tablespoons Dijon mustard 2 large egg white, lightly beaten ½ cup almond meal 2 tablespoons finely chopped fresh parsley (sub 1 teaspoon dried) 1 ½ tablespoons organic ghee 4 lemon wedges Directions:
I hope you enjoy this dish as much my family does! Thank you in advance for sharing this recipe if you are so inspired:) Your support means a lot to me and helps me help more people! ~Billie p.s. - If you like meals like these, you may like our Anti-Inflammatory Meal Plans. You get 5 new dinner recipes weekly with preparation tips and grocery lists to make your life easy! Sugar Free, Dairy Free, Gluten Free, Grain Free, & Low Carb 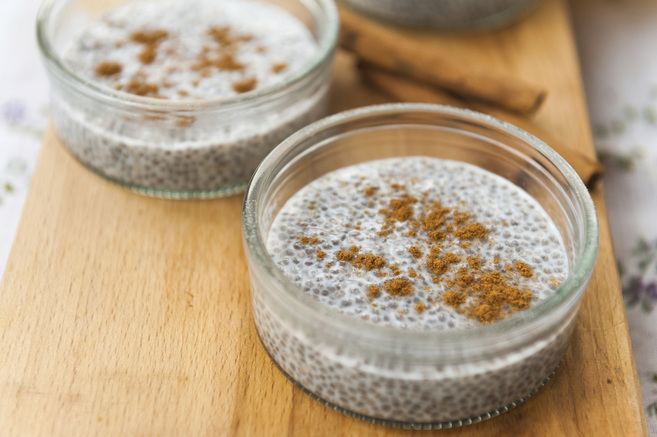 Chia seeds are a powerful super-food with healthy omega fats and energy boosting properties. They are packed with fiber and protein to keep you feeling full. Perfect for before or after a workout to boost your energy. Plus, cinnamon has been shown to help balance blood sugar and reduce cravings for sweets. So this is a great recipe to have handy when those sweet cravings hit and you want to make a healthy choice.
This is just 1 of over 30 clean, low-carb and naturally sugar-free recipes in our new eBook, 10 Day Sugar Detox. This 10 day clean eating plan will help you decrease the amount of sugar in your diet, boost your metabolism, and even help you lose weight. Most recipes can be make in 30-45 minutes and the eBook includes a weekly "make-ahead" preparation plan as well as grocery shopping lists to help save you time and stress! Cinnamon-Spiced Chia Pudding (PRINT RECIPE) (Makes 4 servings) Ingredients: 2 cups unsweetened almond milk or coconut milk 5-10 drops liquid stevia 1 teaspoon vanilla extract 1 teaspoon cinnamon ½ teaspoon ground ginger 6 tablespoons chia seeds Optional Toppings: ¼ cup shredded unsweetened coconut ¼ cup raw walnuts, chopped Fresh berries** Directions:
This keeps well in the fridge for about 3-5 days. I like to make a batch at the beginning of the week and scoop out a snack when I’m craving something sweet! **Adding berries will add more sugar to this meal and can increase your cravings for more sugar later in the day, so if you choose to add these, keep it to a small amount. Example: 2 strawberries, sliced or 6 blueberries. Enjoy & let me know what you think, Billie Anti-Inflammatory. Paleo. Low Carb. Dairy Free. Grain Free. Soy Free. 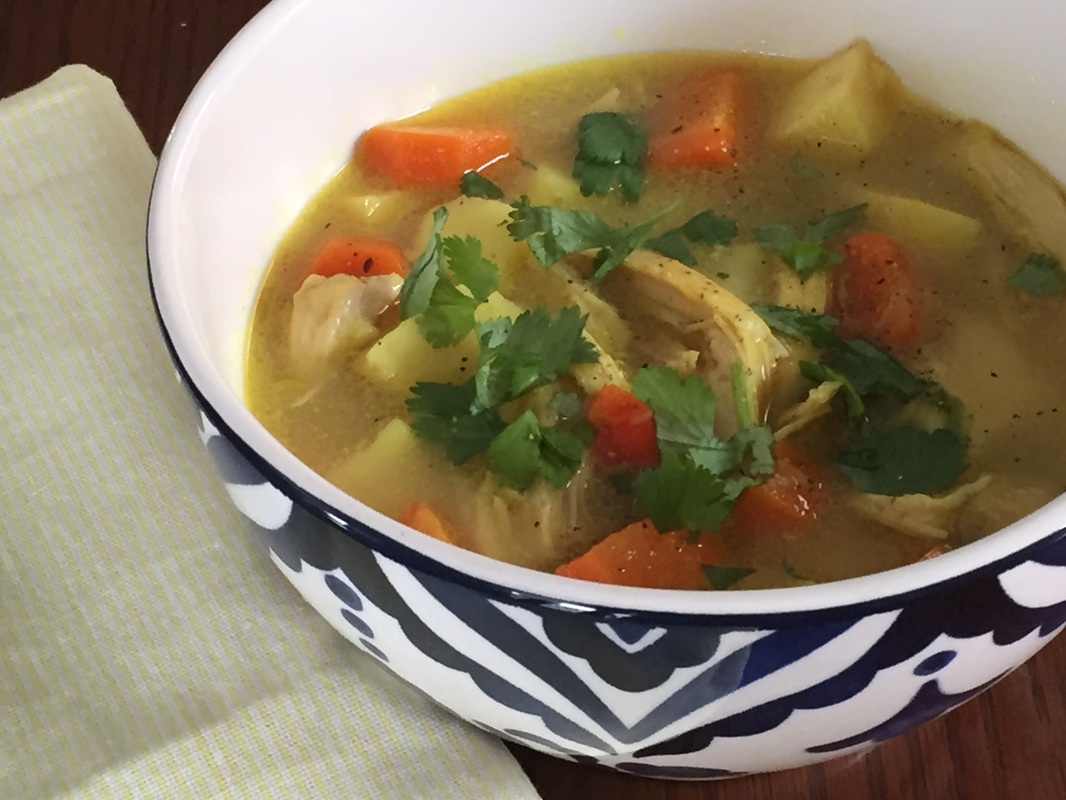 I created this recipe last year when I was trying to get more turmeric into my diet to help manage my inflammatory symptoms from Chronic Lyme Disease. It is still a personal and household favorite - it warms the body, soothes the gut, and gives you a huge boost of nutrient dense foods all in one bowl! I'm all about getting turmeric into my diet wherever I can and this recipe is one my favs!
Turmeric is arguably one of the worlds most potent anti-inflammatory foods and several studies have shown it can play a large role in managing and reversing some of our most difficult auto-immune and inflammatory conditions. Head on over to our blog, 7 Health Benefits of Turmeric & Curcumin, to learn more about this powerful medicinal spice! I love crockpot meals not only because you can toss a bunch of stuff in a pot and come out with complete deliciousness in 4-6 hours but, crockpots are also great vessels to double or triple recipes like these. I always take advantage of this to use my limited energy well in the kitchen. I generally triple this recipe -we eat 4 servings for one meal, I keep 4 servings in the fridge for 4 days and use it for quick, health lunches, and I freeze another 4 servings so that I've got an easy meal down the line when my fridge is out of fresh food and I've not made it to the grocery store yet. Can you relate?! If so, check out this healing, delicious soup... Crockpot Turmeric Chicken Stew (PRINT RECIPE): Serves 4+ Ingredients: 2 pounds organic, boneless skinless chicken thighs 1 tablespoon coconut oil, melted 1 medium to large onion, diced 3 carrots, peeled and sliced into ¼ inch rounds ½ a red bell pepper, diced* 1 teaspoon ground turmeric 2 cloves garlic, minced 1 inch ginger, peeled and minced 1 small-medium sweet potato, peeled and cubed into bite size pieces* 1 quart organic chicken broth or homemade bone broth for an extra immune boost 1 cup coconut milk, reserve ¼ cup 1 tablespoon arrowroot powder (sub cornstarch if needed) ½ cup cilantro, chopped for garnish Salt & pepper to taste Directions:
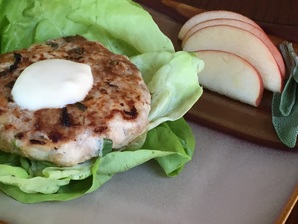
*For nightshade free, you can drop the sweet potatoes and the bell pepper off the recipe and increase the carrots and/or add some raw cauliflower. From my kitchen to yours...enjoy! ~Billie p.s. - If you want more anti-inflammatory meals like this one, check out our Downloadable ,One Week Anti-Inflammatory Meal Plans and eBooks. Anti-Inflammatory, Paleo, Low-Carb, Gluten Free, Dairy Free, Egg-Free Optional  We couldn't let Fall go by without giving you another awesome, apple recipe. These organic turkey burgers are packed with flavors like sage and green onions, and diced or grated apple helps the burger stay moist as you cook it.
This recipe is a family favorite and is just one of the delicious meals inside our NEW! Downloadable, One Week Seasonal Meal Plans Check it out... Apple-Sage Turkey Burgers with Garlic Aioli (PRINT RECIPE) Makes 4-5 burgers; total time 35 minutes Ingredients: For the burgers: 1 ¼ pounds organic, free range ground turkey ¼ cup almond meal (omit if you are sensitive to nuts or don't have any) 2 scallions, thinly diced 2 tablespoons fresh sage, minced ½ cup shredded apple (sweet or tart) 1 tablespoon Dijon mustard 2 cloves garlic, minced ½ teaspoon salt ½ teaspoon pepper 1/2 tablespoon coconut oil, red palm oil, or grapeseed oil 4-8 large leaf lettuce leaves for burger wraps (like Boston, Butter, or Bibb Lettuce) (sub burger buns of choice) For the aioli:* ¼ cup organic mayonnaise made from cage free eggs and olive oil 1 clove garlic, minced 1 teaspoon Dijon mustard Salt and pepper to taste 1 tablespoon fresh lemon juice *leave out aioli and just use Dijon mustard as garnish if you want an egg-free meal. Directions:
Enjoy, enjoy...and share this blog if you like this recipe please! ~Billie Anti-Inflammatory. Gluten Free. Soy Free. Dairy Free Optional. 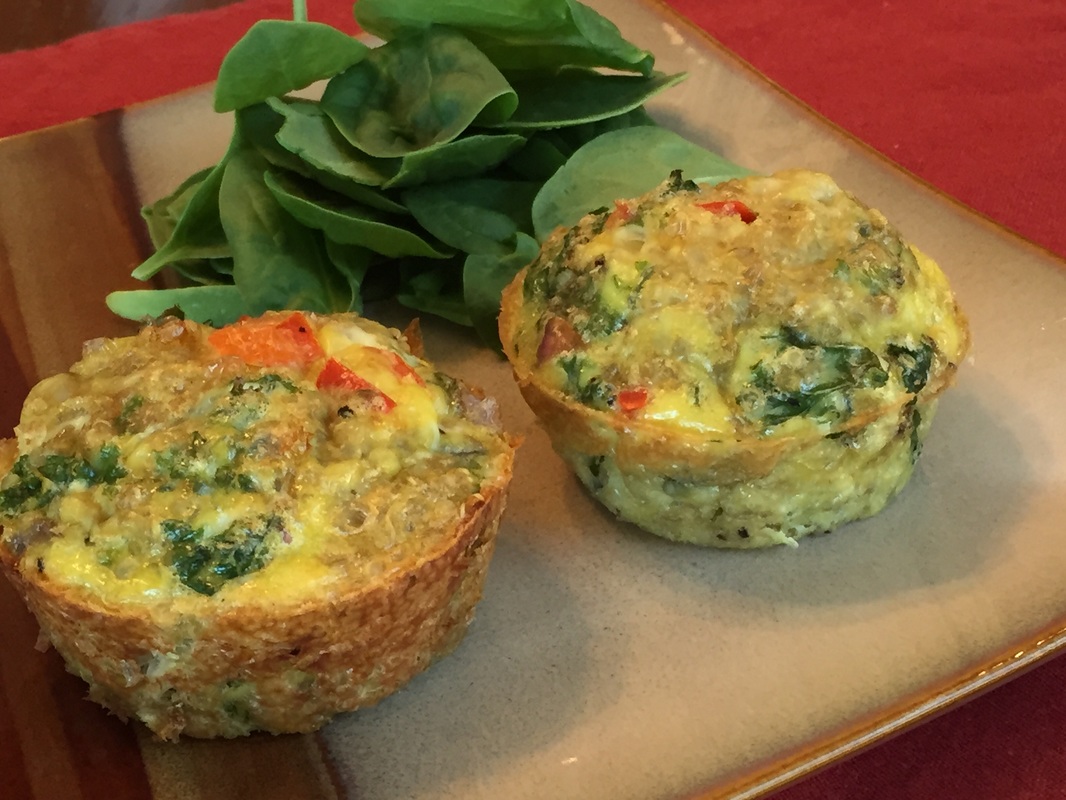 These mini frittatas are a perfect way to get some clean protein, healthy fat, leafy greens, and antioxidant filled veggies in for the day. Have two of them for a quick weekday breakfast or pre-packed lunch with some mixed greens or a green protein smoothie on the side or have one as a snack during a busy day on the go. These taste great right out of the oven, but you can also reheat them in your toaster oven, microwave, or in your regular oven at 350 degrees on a cookie sheet. We recommend making a big batch at the beginning of the week so that you can make two to six quick meals out of it depending on the size of your family. We also designed this recipe so that you can customize it to your liking, seasonal availability, and what you actually have in your fridge:) In fact, these frittatas are a great way to use up veggies in your fridge that need to be used or leftover veggies from meals during the week. The frittatas pictured above contain kale, red onion, scallion, red bell pepper, and dill - these are the items we had left in our fridge so I just tossed them all in! I encourage you to take the same approach and have some fun with it. If you need some suggestions to get the creativity going...you will find them below in the recipe text after the step by step pictures. Your first step is to start your quinoa if you don't have any cooked already on hand. While your quinoa cooks, you will chop the greens and dice the veggies and toss them into a skillet with some ghee, coconut oil, or organic, grass-fed butter. Once all veggies are sauteed, then add the cooked quinoa to the skillet and stir until well combined. Scoop quinoa-veggie mix into each of the 12 muffin cups evenly, about 1/2-2/3 way full. You can alternatively use a 9 X 13 casserole dish or pie dish. Add fresh herbs and cheese (if using). It will look like this: 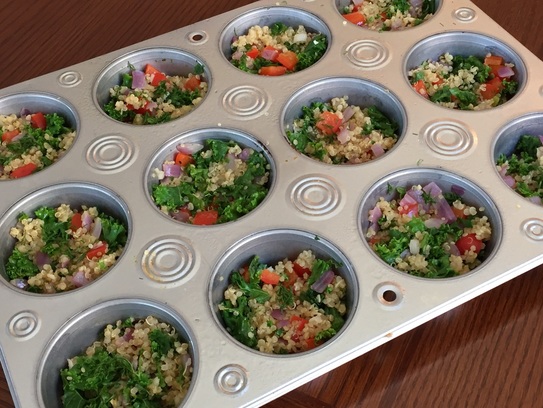 Once you pour in the egg-milk mixture, your mini frittatas should be filled very close to the top but not quite: 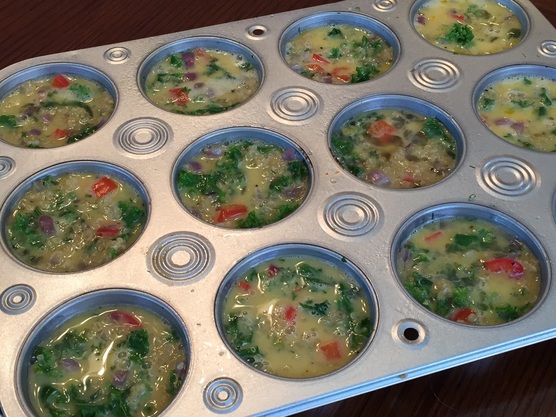 Seasonal Vegetable & Quinoa Mini Frittatas (PRINT RECIPE) (PRINT DAIRY FREE RECIPE)
Makes 12 mini-frittatas Ingredients: ½ cup dry quinoa, rinsed and drained 1 cup organic bone or vegetable broth or water 10 large, organic eggs from pastured chickens ½ cup non-dairy milk of choice – like coconut or hemp 2 tablespoons coconut oil or organic ghee, divided 5-6 cups of packed dark leafy greens – kale, chard, or spinach 2-3 cloves garlic, minced 2-3 cups diced seasonal veggies of choice - mix 2-3 different types; see suggestions below* ¼ cup fresh herbs or 2 tablespoons dried- such as: dill, basil, oregano, thyme, parsley, cilantro, rosemary, or sage 2 ounces shredded or crumbed cheese of choice - such as: feta, cheddar, Gruyere, Parmesan, or goat) (optional) 1/2 teaspoon salt 1/2 teaspoon pepper Directions:
Recipe Combination Ideas:
We'd love to see the combinations you make...post back and let us know which are your favorites! Enjoy! ~Billie & Jen Gluten Free. Dairy Free. Low Carb. Soy Free. 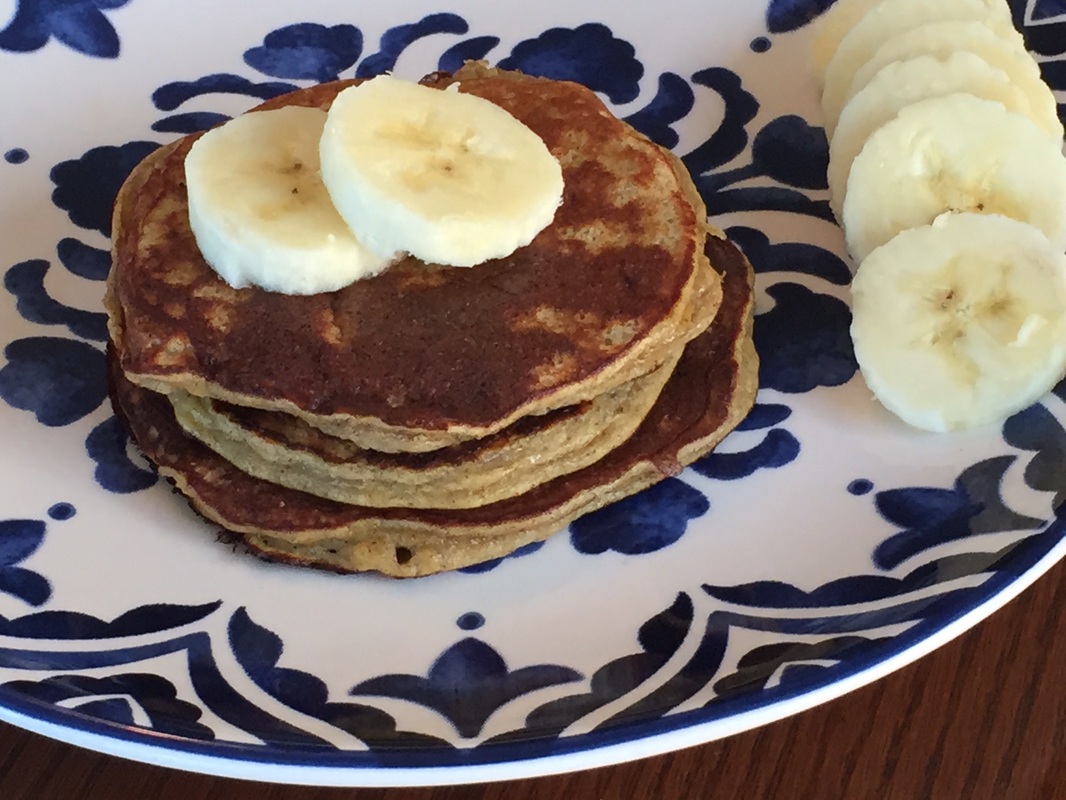 If you are looking for a quick everyday breakfast that will satisfy both grown up and kiddo taste buds alike, try our Banana Protein Pancakes. These babies come together in just 10 minutes and allow you to get your pancake fix without all the sugar, carbs, and grains to slow down your day and your brain. One small serving of 2 pancakes is only 8.7 grams of carbs and 4.9 grams of sugar PLUS you get 9.6 grams of clean protein.
I love to have a small serving along side some organic chicken breakfast sausage and some steamed or sauteed greens or green juice for a complete, balanced breakfast. These taste great all by themselves or add some toppings to your liking - just make sure to keep fruit, honey and/or maple syrup to a small serving size as suggested below so that you don't get a sugar overload. Banana Protein Pancakes (PRINT RECIPE) Makes 4 small servings (two, 3"pancakes) or 2 larger ones (four, 3" inch pancakes) Ingredients: 1 medium-large unripe (green-ish) banana* 2 large organic, pastured eggs 3-4 tablespoons protein powder – unflavored or vanilla** 1 teaspoon ground cinnamon 2 teaspoons coconut oil Suggested Topping Options: 1/4 cup sliced banana 1/4 cup berries 1 tablespoon almond or peanut butter 1-3 teaspoons maple syrup 1-3 teaspoons honey 1 tablespoon unsalted butter or ghee Directions:
*Unripe or green bananas are an excellent form of resistant starch that helps to stabilize your blood sugar and prevent energy swings. **You could also do chocolate protein powder and make chocolate banana pancakes. Make sure to choose a protein powder that is gluten, dairy, soy and GMO free. We recommend vegetable based protein powder. Learn more and see what brands we recommend on our blog post: How to Choose a Protein Powder. Enjoy! ~Billie & Jen Vegan, Gluten Free, Soy Free, Low Carb, Anti-Inflammatory 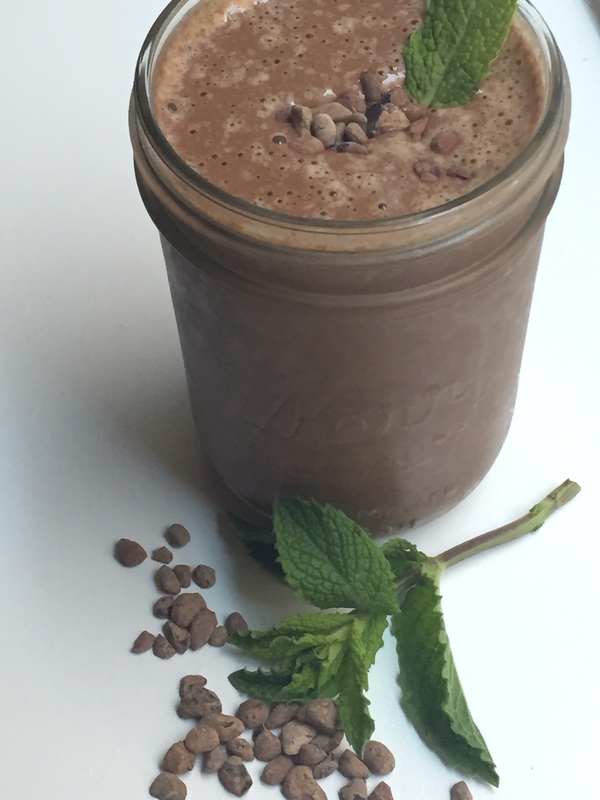 A few weeks ago, my husband I went to Santa Rosa, CA for some appointments with my Lyme doctor and to have some special treatments and therapies to continue to help me battle this difficult disease. During our stay there, we were able to meet up with my favorite cousin, Mike, his wife Cynthia, and their two beautiful daughters at the Petaluma Creamery. P.S. - For any of you who live in this area and love real dairy products, this place had some amazing ice cream and cheeses! Seriously - a must try!
As you can imagine, going to a creamery is torturous for someone who doesn't eat dairy! Cheese and ice cream used to be some of my favorite foods before going dairy free 3 years ago. Usually I have no problem avoiding dairy and don't really crave it much anymore. That day, I went there with the intention to NOT eat ice cream, but I DID!! When my husband walked out with my all time favorite ice cream, MINT CHIP, I just knew I had to have a bite...actually 3 big bites. It was my first time eating ice cream in 3 years and the cheat was worth it!! It was so creamy and delicious that since then, I've been craving my old favorite. So this week I took that inspiration down a healthier route to create an amazing new green smoothie recipe. A deep chocolate flavor with a bright mint after-tone cover up any sign of "the greens" at all, making this recipe a perfect way to get 1 cup of greens in for the day! Kids and adults alike will love this dessert-like smoothie. Plus the fresh mint is packed with nutrients and antioxidants that promote a healthy digestion, improve energy and mood, alleviate allergy and cold symptoms, and reduce sugar cravings. This food's medicine is right up my alley and tastes like a dessert, what more can you ask for?! Mint Chocolate Chip Green Smoothie (PRINT RECIPE) Serves 2 Ingredients: 2 cups romaine or other light greens ½ cup packed fresh mint leaves 2 scoops chocolate protein powder** 2 tablespoons organic cocoa powder or raw cacoa nibs 1 ½ cups unsweetened coconut milk 1-2 large handfuls of ice (depending on how cold and icy you like it) Directions:
~Billie Also, if you like this recipe, you may be interested in these other blogs: **How to Choose a Healthy Protein Powder Health Benefits of Mint Cocoa vs. Cacao - What's the Difference? Kick Your Cravings Chocolate Shake Perfect Green Smoothie Grain Free. Dairy Free. Soy Free. Low Carb. So Delicious. 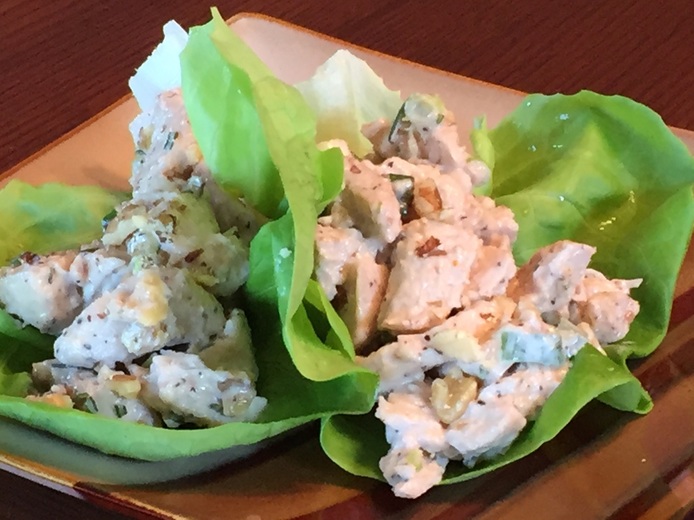 This recipe leads with whole food ingredients like freshly chopped rosemary, raw walnuts, and green onions and its creamy consistency will melt in your mouth. I like to enjoy this chicken salad in a lettuce wrap but if you'd like to add some grains to this meal, toss it into a sprouted grain tortilla, wrap, or whole grain sandwich bread.
It's a perfect fast meal to enjoy on a weeknight and makes for great leftovers for lunches during the week. Each time I make this for my family or friends, I get rave reviews and now I'd like to share it with you... Rosemary Chicken Salad Wraps (PRINT RECIPE) Serves 4 Ingredients: 1 ¼ -1 1/2 pounds organic, free range chicken breast, sliced into ½ wide, 2-3 inch long strips 1 tablespoon grapeseed oil 3 scallions, diced 1/3 cup mayonnaise made from cage free eggs and olive oil 1/3 cup raw walnuts, chopped 1 ½ teaspoons fresh rosemary, chopped 1 ½ teaspoons Dijon mustard ¼ teaspoon salt ¼ teaspoon black pepper 8 butter or large leaf lettuce cups Directions:
Hope you enjoy this recipe as much as I do! Let me know what you think. ~Billie Grain Free, Dairy Free, Soy Free & Low Carb  Hey friends...I'm back to share a new recipe with you...one that I know you are really gonna love! It's been about 2 months since I've been able to spend time in my kitchen experimenting with some new recipes and my soul has been craving it big time!
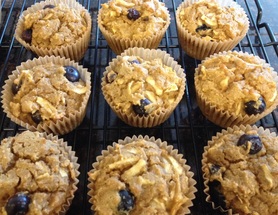
This weekend I finally made it back into the kitchen for some of my favorite, "creative cooking and baking time"....aah...cooking, baking and eating whole foods really feeds my soul as much as my body. Now it's time to share a new recipe that will hopefully fuel your soul and body as well. I instantly fell in love with these muffins after the first batch- a great, fresh treat for Spring. These would be a perfect addition to your Easter Sunday or Mother's Day Brunch spread. These little muffins use coconut flour as their base, you can learn more on our blog post: 4 Tips for Baking with Coconut Flour . They are light weight, grain-free, and low in carbs & sugar...a perfect treat in the perfect size for anyone following a paleo style or low carb diet. In fact they are under 6 grams of carbs and 4 grams of sugar per serving and super easy to make. Check it out... Mini Honey-Lemon Muffins (PRINT RECIPE) Makes 20 mini muffins or 12 regular size muffins Ingredients: 6 organic, pastured eggs ½ cup unsweetened coconut milk (You can substitute your favorite milk instead if you prefer.) ¼ cup + 1 heaping tablespoon honey or agave 1 ½ teaspoons vanilla extract ¼ cup coconut oil, melted & divided Juice and zest of one lemon Heaping ½ cup coconut flour ¾ teaspoon baking power ½ teaspoon salt Directions:
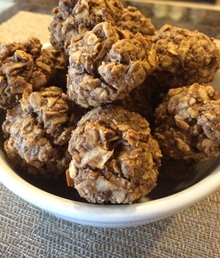
The lemony flavor gets stronger after they cool and ever more so the next day. These will stay moist in an airtight container for up to 4 days on your counter top if they last that long. If you'd like a richer taste, trying spreading on a little organic, grass-fed butter or ghee and drizzle some extra honey. Let me know what you think. Happy Baking! ~Billie Grain Free. Vegan. Paleo. Low Carb. Low Sugar. Super Good. 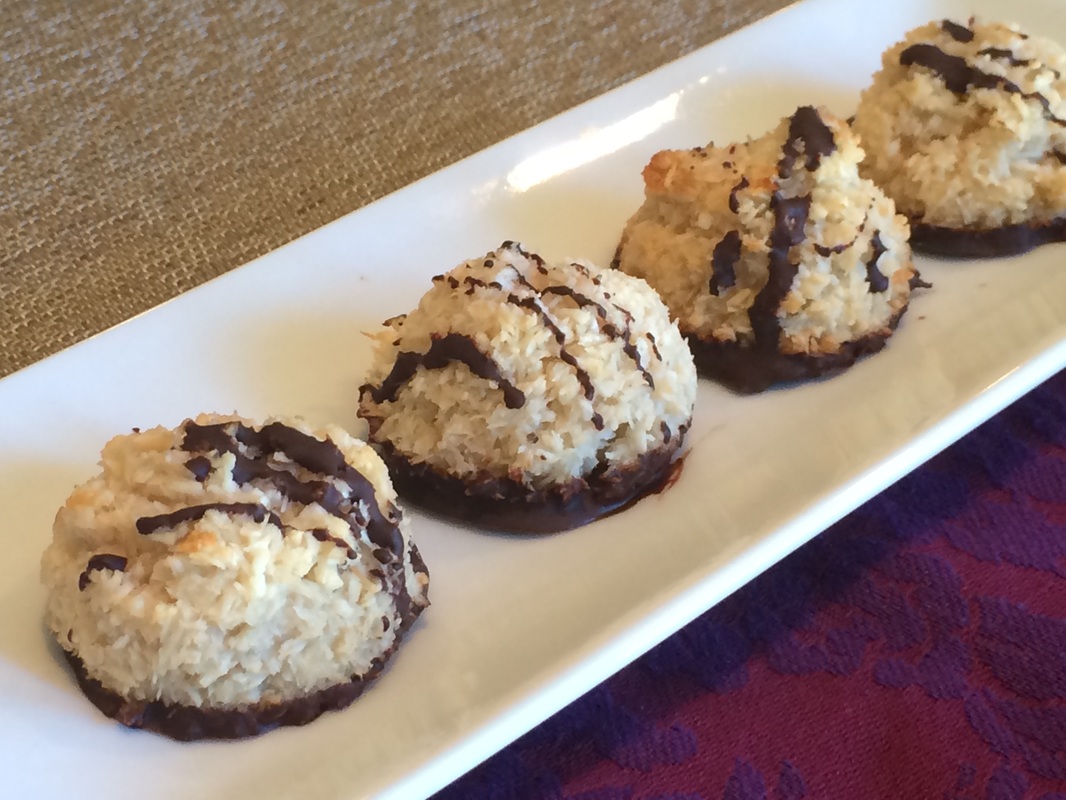 Macaroons may seem like they would be tough to make, but it only takes six simple ingredients and little bit of time to make these delectable and beautiful treats. Each bite is slightly crunchy on the outside and soft and moist on the inside. YUM...writing this blog is making me want to eat another one.
Instead of using sweetened condensed milk like most macaroon recipes do, we substituted a can of full fat coconut milk and some honey that we boiled down to make a thicker, sweeter milk. It is similar enough to sweetened, condensed milk but with healthier fat and a cleaner sugar choice...and it really pulls these treats together nicely! If you are on a low or little to no sugar diet like I am, these beauties fit the bill. They are under 5 grams of sugar and 8 grams of total carbs per serving, making them a great low carb dessert for your holiday, special occasion or for when a sweet tooth strikes. A must try for anyone wanting a simple, elegant dessert that is light on sugar and carbs. If you like this dessert and want more recipes like these, check out my Anti-Inflammatory Diet Holiday Cookbook, with 24 more additional recipes that are low sugar, paleo, mostly grain free, dairy free, gluten free, and soy free. Dark Chocolate Drizzled Coconut Macaroons (PRINT RECIPE) Makes about 18 macaroons Ingredients: 1 (14-ounce) can full fat coconut milk ¼ cup raw honey or agave 2 cups unsweetened shredded coconut ½ teaspoon vanilla extract Pinch of salt 1 (3-ounce) dark chocolate bar Directions:
Enjoy friends! ~Billie & Jennifer 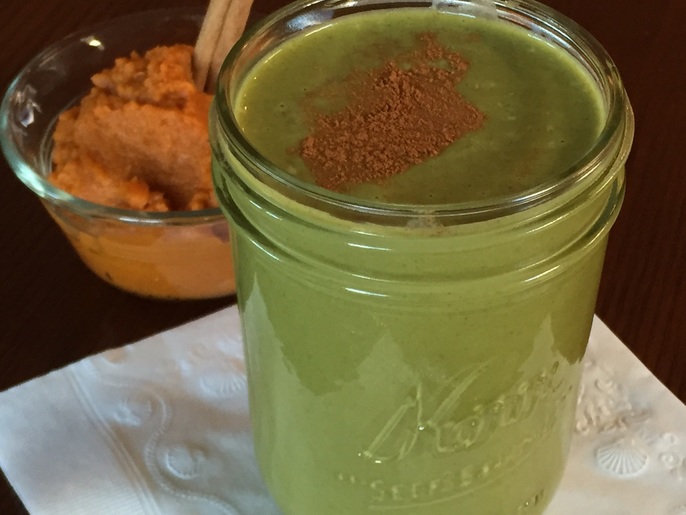 Last Thanksgiving day I woke up and was confronted with several prepared holiday desserts sitting on my counter top - just staring at me asking to be eaten. Can you relate?! A few years ago, I would have started the day with a slice of pumpkin pie, a cookie, brownie, or something else sweet just because it was a holiday and I felt like I could treat myself.
But these days, I try to avoid sugar, especially first thing in the morning. My experience with myself and my clients is that if you start your day with sugar, your body will continue to crave carbs and sugar throughout the day. This can cause you to overeat or fill up on the wrong types of foods all day long. It can also turn on "fat storage" hormones like cortisol and insulin and tell your body to store fat and not burn it for energy. This can leave you feeling lethargic and a bit slow in the brain - not cool! So instead, I thought I'd try something new in my blender to help me feel like I was getting a "special holiday treat". One of my traditional green smoothies, but with pumpkin puree and holiday spices. The result...AMAZING! So amazing in fact, I had to have one for the next three mornings straight:) And I HAD to get it up on the blog to share with you. Pumpkin Green Smoothie (PRINT RECIPE) Makes 2 smoothies Ingredients: 1 cup spinach 1-1 1/2 cups romaine 1 scoop protein powder of choice* 2 tablespoons ground flaxseed 1 tablespoon almond butter** 1/4 cup 100% pure pumpkin puree 3/4 teaspoon pumpkin pie spice 1/4 teaspoon ground ginger or 1/2 teaspoon grated fresh ginger 1 1/2 cups unsweetened almond milk 1/2 cup - 1 cup ice cubes (depending on how cold and icy you like it) Directions:
Hope you enjoy this just as much as I do! ~Billie *We recommend a protein powder that is low in carbohydrates & sugars and high in protein. Use the 10/15/20 rule—you want 10 or LESS grams of sugar, 15 or LESS grams of total carbohydrates and 20 or MORE grams of protein per serving. Nutritional information assumes you follow the above rule when selecting your protein powder **You can also do sunflower seed butter or just an additional scoop of protein powder if you prefer here. Grain Free. Gluten Free. Dairy Free Version. Soy Free. Paleo. Low Carb. Super Easy & Delicous 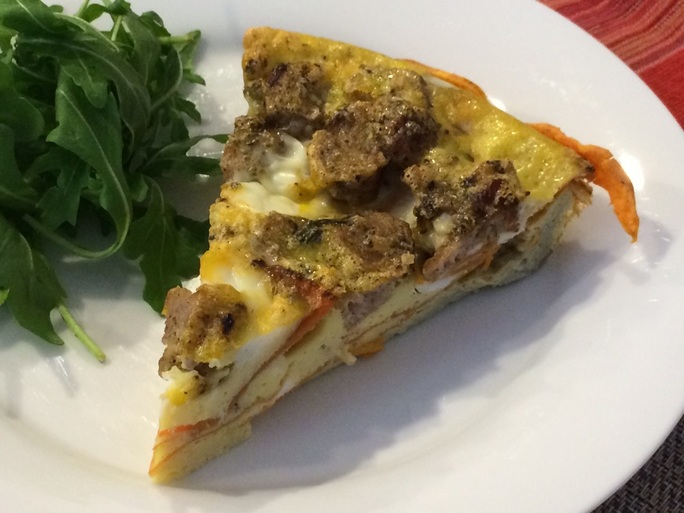 The sweet potatoes in this dish make an excellent alternative to the traditional flour based pie crust...they provide a sweet taste to match the savory flavors of sausage and sage. Sweet potatoes are loaded with immune boosting antioxidants and make a great friendly carbohydrate choice because they work to stabilize your blood sugar and keep you feeling fuller longer compared to flour or white potatoes. Check out our blog, Health Benefits of Sweet Potatoes, to learn more and grab some other dishes that feature sweet potatoes.
This quiche comes together in under 15 minutes hands-on time and makes for both a great casual breakfast or fancy brunch dish. Big winner in my household and with our guests! Sausage & Sage Quiche with Sweet Potato Crust (PRINT RECIPE) Serves 6 Ingredients: ½ tablespoon coconut oil 1 small to medium sweet potato, peeled ½ pound organic chicken breakfast sausage, thinly sliced if precooked or casings removed & crumbled if raw 1 teaspoon chopped fresh sage (rosemary also works lovely here) 9 organic, pastured eggs 3 tablespoons whole milk (or non-dairy milk) 2 tablespoons gruyere cheese, grated (optional) ½ teaspoon sea salt ¼ teaspoon ground pepper Directions:
Time Saving Tips: You can also do steps 2 through 6 ahead of time, cover and refrigerate. Then add the egg-milk mixture in the morning and pop it into the oven to bake for an easy breakfast or brunch option. This quiche keeps very well in the fridge for up to 4 days and can be reheated for a nice lunch or snack. PRINT GLUTEN FREE VERSION PRINT GLUTEN & DAIRY FREE VERSION Hope you enjoy this as much as we do! ~Billie |

Billie Shellist, FDN-P
I practice functional nutrition, an approach that allows me to look at your entire health history and help you find the "root causes" of your chronic health complaints. This cuts out the trial and error process and helps you get real symptom relief and resolution! Food is medicine and knowledge is power -I hope you enjoy my anti-inflammatory recipes which are gluten, dairy, and soy free as well as very low grain and sugar. If you'd like to heal from the root cause(s) of your chronic symptoms, try starting with a complimentary 15-minute consultation. Click here to request your free session. |

|
Copyright 2024 Functional Diagnostic Healing. All rights reserved. Professional photography by Priscilla Durkin- www.priscilladurkin.com Privacy Policy - Legal Notice |